Security misconfiguration has long been a top concern for website security, and in 2021, the OWASP Top 10 team highlighted it as one of the most common reasons websites are hacked.
Among the potential misconfigurations, security headers play a critical role.
These headers are essential for protecting your website from various threats, and proper server configuration can prevent many common attacks.
Hackers try many creative ways to exploit website vulnerabilities, but did you know that a significant number of attacks can be easily avoided by simply using the proper server configuration?
HTTP security headers might seem technical, but they’re a simple and effective way to add an extra layer of protection to your site. We’ll cover how they work, why they’re important, and practical steps to ensure your WordPress site uses them correctly.
But before we do that, let’s first discuss what a security header is.
What are HTTP security headers?
Security headers are instructions that web servers send to web browsers when a user visits a website. These headers tell the browser how to handle and interact with the website's content, adding an extra layer of security beyond what's provided by the website's code alone.
When a user's browser connects to a website, the web server responds with the website's content and any security headers that have been configured. The browser then interprets these headers and applies the specified security policies.
For example, the "X-Frame-Options" header tells the browser whether or not the website can be displayed within an iframe on another website, helping to prevent clickjacking attacks.
Similarly, the "Content-Security-Policy" header specifies which sources of content (scripts, images, etc.) are allowed to be loaded on the website, mitigating the risk of cross-site scripting (XSS) attacks.
By implementing these security headers, website owners can significantly improve the overall security of their sites and protect their users from a wide range of common web-based attacks.
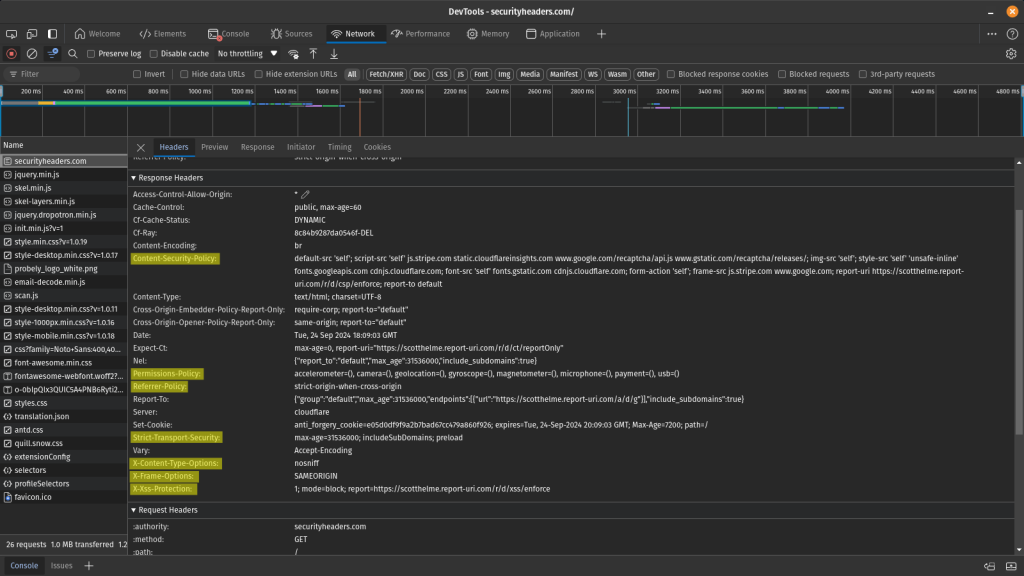
HTTP headers are usually not visible to website users, but you can open the Developer tools to inspect the website's response headers. The highlighted lines in the following image show different security headers.
Types of HTTP security headers
There are many different types of security headers. Let’s examine some of the most important ones.
X-Frame-Options
The X-Frame-Options header prevents clickjacking attacks.
A clickjacking attack is a malicious technique in which an attacker tricks a user into clicking on something different from what the user perceives. This could potentially lead to unauthorized actions or information disclosure.
This header instructs the browser whether or not to allow the website to be displayed within an iframe on other sites. By setting this header to 'DENY' or 'SAMEORIGIN' you can ensure that your website cannot be embedded in potentially malicious frames, significantly reducing the risk of clickjacking attacks. This is particularly important for sites that involve user interactions, such as login forms or payment gateways.
Example:
X-Frame-Options: <value>
In the above example, you can configure the header to use one of the following values:
- deny parameter will completely deny rendering within the iframe.
- sameorigin parameter will deny rendering if the origin mismatches.
- allow-from: example.com parameter allows rendering if it is framed by a frame loaded from the specified domain.
HTTP Strict Transport Security (HSTS)
HTTP Strict Transport Security (HSTS) is a vital security header that enforces secure connections to the server. It instructs the browser to always use HTTPS instead of HTTP for future requests, even if the user types "http://" or clicks on an HTTP link to the site.
By encrypting all communication, HSTS protects sensitive data in transit, such as login credentials or personal information. It's essential for e-commerce sites, banking applications, or any platform handling sensitive user data.
The header also includes options to set how long the browser should remember to use HTTPS and whether to include subdomains in this policy.
Example:
Strict-Transport-Security: max-age=<expire-time>; includeSubDomains
In the above example, you can configure the following parameters:
- max-age parameter will set the time, in seconds, for the browser to remember that this site can only be accessed using HTTPS.
- includeSubDomains is an additional parameter that can apply this rule to all the site’s subdomains.
Referrer-Policy
The Referrer-Policy header controls how much referrer information should be included with requests. This is important for protecting user privacy and preventing information leakage. When a user clicks a link on your site to go to another site, the destination can typically see where the user came from. This header allows you to control this behavior by limiting the information sent in the referrer header.
For instance, you might set it to 'strict-origin-when-cross-origin' to send the origin, path, and querystring when performing a same-origin request but only send the origin when the protocol security level stays the same (HTTPS→HTTPS) while performing a cross-origin request. This helps maintain user privacy while providing helpful information for analytics and security purposes.
Read the official Mozilla web docs post to learn how to implement the Referrer-Policy header.
X-Content-Type-Options
The X-Content-Type-Options header is a simple yet effective measure against MIME-type confusion attacks. Setting it to 'nosniff' prevents browsers from trying to guess ("sniff") the MIME type of response based on the file's content. This is important because MIME-type sniffing can lead to security vulnerabilities where malicious files are executed as a different content type.
For example, without this header, a malicious user could upload an HTML file disguised as an image, which could then be executed as HTML, potentially leading to cross-site scripting (XSS) attacks.
Implementing this header ensures that browsers strictly interpret the declared content type, reducing the risk of content-sniffing attacks.
Example:
X-Content-Type-Options: nosniff
There are no additional parameters to configure for this security header. You can either add it to your website or omit it.
Content Security Policy (CSP)
Content Security Policy (CSP) is a powerful security header that helps prevent various attacks, including Cross-Site Scripting (XSS) and other code injection attacks. It works by specifying which dynamic resources are allowed to load on a web page.
With CSP, you can tell the browser exactly which content sources are approved, controlling everything from which scripts can run to which images, fonts, and stylesheets are allowed to load. This granular control will enable you to mitigate the risk of XSS attacks by ensuring that even if an attacker manages to inject malicious content, it won't be executed because it's not from an approved source.
CSP can also help prevent clickjacking and other injection-based attacks. While it can be complex to implement, especially on large, existing websites, CSP offers one of the most comprehensive protections against client-side attacks.
Example:
Content-Security-Policy default-src 'none'; script-src 'self'; connect-src 'self'; img-src 'self'; style-src 'self';
In the above example, you can configure the following options:
- default-src parameter is the default policy for loading content such as JavaScript, Images, CSS, Fonts, AJAX requests, Frames, and HTML5 Media.
- script-src parameter defines valid sources of JavaScript.
- connect-src parameter applies to XMLHttpRequest (AJAX), WebSocket or EventSource. If not allowed, the browser will emulate a 400 HTTP status code.
- img-src parameter defines valid sources of images.
- style-src parameter defines valid sources of stylesheets.

Permissions-Policy
The Permissions-Policy header lets you control which browser features and APIs can be used on your website. This is important for several reasons. First, it helps improve user privacy by limiting access to sensitive APIs like geolocation or camera access. Second, it can improve performance by turning off unused features. Lastly, it enhances security by reducing your application's attack surface.
For example, you can use this header to disable outdated APIs that might pose security risks or to ensure that certain features are only used in specific parts of your site. By carefully configuring the Permissions Policy, you can create a more secure and efficient web application, giving you fine-grained control over how browsers interact with your site.
Creating permissions policies can be challenging. We recommend using online tools like the Permissions Policy HTTP Header Generator to selectively turn permissions on your site on and off. Additionally, you can read Google’s blog post to understand how to use permissions policies to turn off certain browser functionality.
X-XSS-Protection
The X-XSS-Protection header was designed to enable the built-in reflective XSS protection found in some browsers. This header instructs the browser to stop loading the page when it detects a potential XSS attack. Modern browsers have largely deprecated this header in favor of more comprehensive solutions like Content Security Policy (CSP).
The header can be set to '1; mode=block', which not only stops the execution of the XSS attack but prevents the page from rendering entirely. However, it's important to note that while this header can help mitigate some XSS attacks, it shouldn't be relied upon as the sole defense against XSS vulnerabilities.
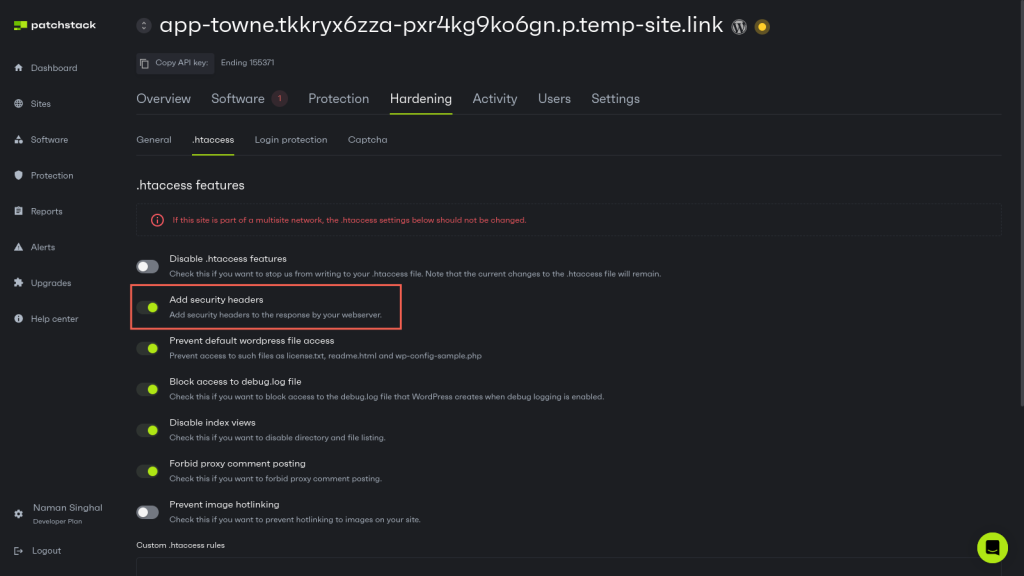
Adding HTTP headers in WordPress using Patchstack
If you use Patchstack, adding security headers in WordPress is very simple.
Simply navigate to Hardening > .htaccess in your Patchstack dashboard and ensure the “Add security headers” option is turned on.
Once enabled, Patchstack will automatically add relevant security headers to your WordPress website.
Configuring HTTP headers manually
Although Patchstack automatically adds some security headers to your WordPress website, some granular security headers, such as permissions policy, are not applied. Each website is different, and mindlessly adding these headers can break the website.
If you wish, you can add any security headers to your WordPress website using the following steps:
Adding HTTP security headers using .htaccess on Apache
Apache is one of the most popular web servers and is widely used to host WordPress sites. It uses the .htaccess file, a particular configuration file that allows for decentralized management of web server configuration. This file is beneficial for implementing HTTP security headers because you can make these changes without modifying the main server configuration file.
Follow the steps below to configure HTTP headers on your Apache server:
- Access the .htaccess file: There are several ways to access your .htaccess file depending on your hosting environment:
- Using File Manager in cPanel: Navigate to your website's root directory (usually public_html) and locate the .htaccess file (if it doesn't exist, you can create one).
- Using FTP: Connect to your server using an FTP client, navigate to your website's root directory, and download the .htaccess file (or create one if it doesn't exist).
- Using SSH: Connect to your server via SSH, navigate to your website's root directory, and use a text editor like Nano or Vim to edit the .htaccess file.
- Edit the .htaccess file: Once you've accessed the .htaccess file, you can add the necessary code to implement the security headers. But before you make any edits, it is a good idea to back up your .htaccess file to avoid any surprises later on.
- Add the security headers: In this file, you can add the relevant code snippets to add security headers and define their parameters as per your requirements. Here are sample code snippets for each header type:
# Enable HSTS
Header always set Strict-Transport-Security "max-age=31536000; includeSubDomains"
# Set X-Frame-Options
Header always set X-Frame-Options "SAMEORIGIN"
# Set X-XSS-Protection
Header always set X-XSS-Protection "1; mode=block"
# Set X-Content-Type-Options
Header always set X-Content-Type-Options "nosniff"
# Set Referrer-Policy
Header always set Referrer-Policy "strict-origin-when-cross-origin"
# Set Permissions-Policy
Header always set Permissions-Policy "geolocation=(), microphone=(), camera=()"
# Set Content-Security-Policy
Header set Content-Security-Policy default-src 'none'; script-src 'self'; connect-src 'self'; img-src 'self'; style-src 'self';
After adding the headers, save the .htaccess file. Then, test your website to ensure it's functioning correctly. You can use online tools like SecurityHeaders.com or Mozilla Observatory to verify that the headers are being sent correctly.
NGINX configuration
If you're using NGINX, the configuration is slightly different. Instead of using .htaccess, you would add headers in your server block in the nginx.conf file. To do this, first locate the nginx.conf file in the /etc/nginx directory and make a backup.
Next, you can edit this file and add the necessary code snippets to configure each security header and its parameters.
For example, here are some sample configurations that you can modify to fit your unique needs:
add_header  Strict-Transport-Security "max-age=31536000; includeSubDomains" always;
add_header  X-Frame-Options "SAMEORIGIN" always;
add_header  X-XSS-Protection "1; mode=block" always;
add_header  X-Content-Type-Options "nosniff" always;
add_header  Referrer-Policy "strict-origin-when-cross-origin" always;
add_header  Permissions-Policy "geolocation=(), microphone=(), camera=()" always;
add_header  Content-Security-Policy "default-src 'none'; script-src 'self'; connect-src 'self'; img-src 'self'; style-src 'self';";
After adding these code snippets to the configuration file, you need to save it. Once you have saved the configuration file, you must reload NGINX using the following command for the changes to take effect:
service nginx reloadWrapping up
This comprehensive guide covered the basic concept of security headers, the different types available, and how to implement them manually using the .htaccess file on Apache servers.
Hopefully, you understand the importance of security headers, including the X-Frame-Options, HSTS, and Content Security Policy at this stage. These headers play a crucial role in enhancing the security of your WordPress site and protecting it from common web-based attacks.
However, while security headers are an essential component of a robust security strategy, they shouldn't be relied upon as the sole solution.
Implementing security headers is just one piece of the puzzle – a well-rounded approach that includes regular software updates, strong access controls, and proactive monitoring is necessary to truly secure your WordPress site.
That's where Patchstack can help.
Patchstack is a comprehensive WordPress security platform that provides 48-hour early warnings for new vulnerabilities, automated patching, and advanced security features to keep your site safe. Signing up for Patchstack ensures that your WordPress site is constantly monitored and protected, even as new threats emerge.
Don't wait until it's too late - sign up for Patchstack to secure your WordPress site.
Frequently Asked Questions: WordPress Security Headers
How can I add WordPress security headers automatically?
If you use Patchstack, you can easily enable the “Add security headers” option on the Patchstack hardening tab. (This only works with sites run by Apache (requires .htaccess).
You can add security headers automatically with Patchstack. Get started with Patchstack here.
<Link to above of PS dashboard photo>
How does the Strict-Transport-Security (HSTS) header work?
The Strict-Transport-Security (HSTS) header forces browsers to use HTTPS instead of HTTP to communicate with your website. It helps protect against protocol downgrade attacks and cookie hijacking by ensuring that all communication with your site is encrypted, even if a user types in "http://" or clicks on an HTTP link to your site.
Why do I need HSTS for WordPress?
HTTP Strict Transport Security (HSTS) allows web servers to declare that web browsers (or other complying user agents) should only interact with it using secure HTTPS connections and never via the insecure HTTP protocol.
How can Patchstack help you to protect your websites?
- Get automated fixes for vulnerabilities before they are exposed to the world.
- Gain an overview of blocked threats and attacks against your websites.
- Patch the main risk for website security – the plugin vulnerabilities.
- Identify vulnerable plugins and know which ones should be updated.
- No hassle, one-minute setup.
Try Patchstack now, and cancel anytime, with a 30-day money-back guarantee.
Security Headers FAQs
Why are security headers necessary for my WordPress site?
Security headers are essential because they protect your WordPress site against common web vulnerabilities. They help mitigate risks by instructing browsers to enable built-in security mechanisms, thereby reducing the attack surface and protecting your site and its users from potential threats.
How do I implement security headers on my WordPress site?
You can implement security headers on your WordPress site in several ways. The most common methods include modifying your .htaccess file, using WordPress security plugins, or adding code to your theme's functions.php file. However, the best method is to use Patchstack’s built-in one-click security header functionality.
Can security headers negatively impact my WordPress site's functionality?
While security headers are generally beneficial, overly strict configurations can potentially interfere with your site's legitimate functionalities. It's important to test thoroughly after implementing new headers and to start with less restrictive policies, gradually tightening them as you ensure compatibility with your site's features.
Are security headers a replacement for other WordPress security measures?
Security headers should be considered part of a comprehensive security strategy, not a replacement for other measures. They work best with other security practices, such as regular updates, strong passwords, limited user permissions, security plugins, and proper server-side configurations.
How can I check if my WordPress site is using security headers correctly?
You can use online tools like SecurityHeaders.com or Mozilla Observatory to scan your website and check which security headers are implemented. These tools also provide recommendations for improving your site's security. Additionally, you can use your browser's developer tools to inspect the headers returned by your server.