This is a practical article that helps you to redirect WordPress from HTTP to HTTPs.
HTTP and HTTPS are two protocols that are used to transfer data between a web browser and a web server.
The main difference between HTTP and HTTPS is that HTTPS uses encryption to secure the data that is sent and received, while HTTP does not. By using HTTPS, even if someone intercepts the data, they will be unable to read or modify it.
HTTPS also protects the website from cyber attacks such as man-in-the-middle, phishing, spoofing, etc. These are attacks in which someone tries to impersonate the website or the user, or redirects them to a fake or malicious website, in order to trick them into revealing sensitive information or installing malware.
The main goal of this article is to show you different methods to redirect your WordPress website from HTTP to HTTPS so that you can enjoy the benefits of HTTPS and make your website more secure, whilst offering greater reassurance to your visitors.

Different ways to redirect WordPress from HTTP to HTTPs
There are many ways to redirect your WordPress website from HTTP to HTTPS, depending on your server setup, your WordPress settings, and your preferences.
In this section, you’ll discover some of the most common and effective methods to do that, using the WordPress dashboard, the wp-config.php file, the NGINX settings, and the Apache settings.
Before you proceed with any of these methods, you need to have an SSL certificate installed on your WordPress website. You can obtain an SSL certificate from various sources, such as your hosting provider, a certificate authority, or a free service such as Let’s Encrypt. If you need help with installing an SSL certificate on your WordPress website, you can read our article on How to Install an SSL Certificate on WordPress.
Method 1: Editing WordPress URL in the dashboard
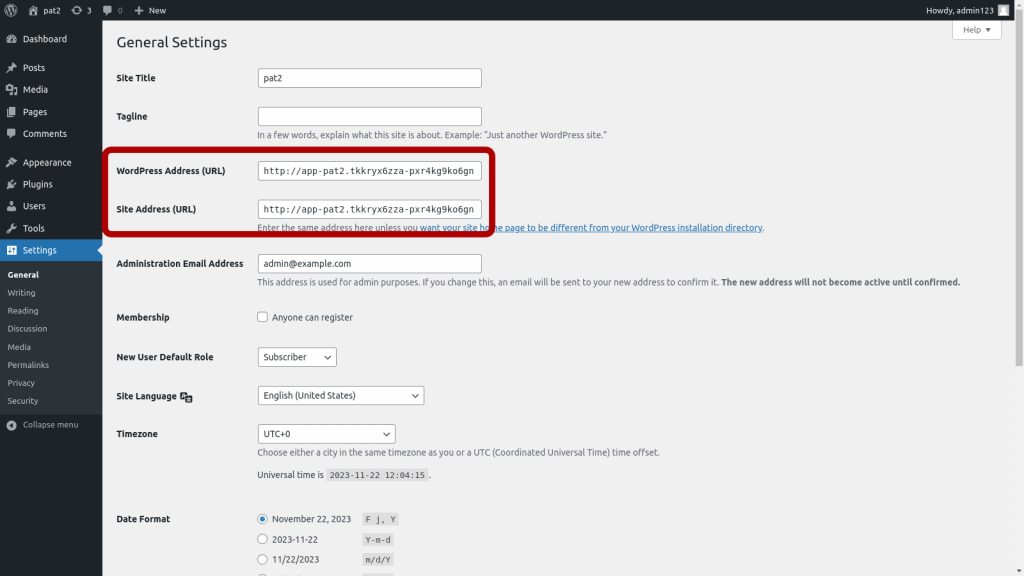
Log in to your WordPress dashboard, then go to Settings -> General. On the General Settings page, you will see several options to configure your WordPress website, such as Site Title, Tagline, Email Address, etc.
Here you need to change your WordPress Address (URL) and Site Address (URL). These are the URLs that WordPress uses to identify and access your website.
To change these URLs from HTTP to HTTPS, you need to replace the http:// part with https:// in both fields.
For example, if your WordPress Address (URL) is http://example.com, you need to change it to https://example.com.
After you have changed the URLs, you will need to scroll down to the bottom of the page and click on Save Changes. This will update your WordPress settings, and immediately begin redirecting your website from HTTP to HTTPS.
Method 2: Setting constant in the wp-config.php file
The wp-config.php file is one of the most important files in your WordPress website. It contains the configuration settings for your WordPress installation, such as database connection details, security keys, debug mode, etc.
You can use this file to customize and optimize your WordPress website according to your needs.
You can find the wp-config.php file in the WordPress root directory. You can access this folder using either a file manager or an FTP client. To edit the wp-config.php file, it will need to be opened with a text editor or a code editor.
The FORCE_SSL_ADMIN constant in WordPress forces all login and admin pages to use HTTPS. This is a quick and easy method to prevent hackers from stealing or tampering with your username, password, and other sensitive information.
To redirect your WordPress website from HTTP to HTTPS, add the following lines of code to the wp-config.php file, before the line that says /* That’s all, stop editing! Happy publishing. */:
define(‘WP_HOME’, ‘<a href="https://example.com">https://example.com</a>’);
define(‘WP_SITEURL’, ‘<a href="https://example.com">https://example.com</a>’);
define( 'FORCE_SSL_ADMIN', true );
Make sure you replace example.com with your actual domain name!
After you have added the code, save the file and then upload it back to the WordPress root directory, if you edited it offline. This will update the WordPress settings and begin redirecting your website from HTTP to HTTPS.

Method 3: Editing NGINX settings
If you are using NGINX to serve your website, you can use it to redirect insecure HTTP requests by creating a specific configuration. To access the NGINX configuration file, it’s necessary to have SSH access to your server, where you have installed NGINX and WordPress.
The NGINX configuration file is usually located in /etc/nginx/nginx.conf, but it may vary depending on your server setup.
To redirect your WordPress website from HTTP to HTTPS, add the following lines of code to the NGINX configuration file, inside the server block that listens on port 80:
server {
  listen 80;
  server_name example.com www.example.com;
  return 301 https://example.com$request_uri;
}
Make sure to replace example.com with your actual domain name. The above code tells NGINX to listen on port 80, which is the default port for HTTP, and to match the server name with your domain name and its www variant. It then tells NGINX to return a 301 redirect to the HTTPS version of your website, using the same request URI. (A 301 redirect is a permanent redirect that tells the browser to use the new URL from now on.)
After you have added the lines of code, save the file and reload the NGINX service. You can use a command such as sudo nginx -s reload to reload NGINX without stopping it. This will apply the changes and start redirecting your website from HTTP to HTTPS.
Method 4: Editing Apache settings
If you’re using Apache for serving your WordPress website, you’ll have to edit the Apache configuration file that is usually located in /etc/apache2/, although it may vary depending on your server setup.
There are multiple ways to redirect your WordPress website on Apache. If you want to redirect a single URL, you can use the RedirectPermanent Directive – add the following lines of code to the Apache configuration file:
<VirtualHost *:80>
  ServerName example.com
  ServerAlias www.example.com
  RedirectPermanent / https://example.com/
</VirtualHost>
Again, make sure you replace example.com with your actual domain name!
Alternatively, you can also use the following lines of code to redirect your WordPress website from HTTP to HTTPS, using the mod_rewrite module:
RewriteEngine On
RewriteCond %{HTTPS} off
RewriteRule ^(.*)$ https://%{HTTP_HOST}%{REQUEST_URI} [L,R=301]
The code above enables the rewrite engine and checks if the HTTPS is off. If it is, it rewrites the request to the HTTPS version of your website, using the same request URI, and sends a 301 redirect to the browser.
After you have added the lines of code, save the file and restart the Apache service. This will apply the changes and redirect your website from HTTP to HTTPS.

When your redirect WordPress from HTTP to HTTPs is almost finished…
Once you’ve updated your website configuration, it’s a good idea to update all of your URLs wherever you are using them. For instance, you should make sure to use the HTTPS URL when you use a CDN, create a sitemap, or submit your site for indexing to a search engine. This will ensure that your website is consistent and secure across all platforms and services.
You might think this is unnecessary as all of the insecure requests will be automatically upgraded to HTTPS. However this will require your visitors to make two HTTP requests instead of one, and this can be frustrating – especially on slower connections.
Redirecting your WordPress website from HTTP to HTTPS is a great step to improve your website security, but it is not enough. You also need to manage vulnerabilities and stay ahead of the bad guys who may try to hack your website.
One of the best ways to do that is to use Patchstack, a cloud-based security platform that protects your WordPress website from hackers, malware, and other threats.
Patchstack monitors your WordPress website 24/7, scans it for vulnerabilities, and automatically patches them before they can be exploited.
Patchstack also provides you with a dashboard, reports, and alerts to keep you informed and in control of your website security.
If you want to learn more about how to secure your WordPress website with Patchstack, we recommend you read How to Secure WordPress Site with Patchstack or just sign up for a FREE FOREVER plan of Patchstack.