This tutorial will cover everything you need to know about SSL certificate and explains how to install SSL certificate on WordPress. It also includes troubleshooting common issues and managing renewals.
Let’s dive in and make your WordPress website more secure and install an SSL certificate on WordPress!
The topic of WordPress security is vast, and there are many security features available to harden your WordPress website. One of them is installing an SSL certificate on WordPress websites. SSL certificates enable your website to use the HTTPs protocol that encrypts and protects any data exchanged between website visitors and servers.
What is an SSL certificate?
Before we get started with the installation process, let’s understand what an SSL certificate is.
An SSL (Secure Socket Layer) certificate is a digital certificate that enables the use of HTTPs (Hypertext Transfer Protocol Secure). The SSL certificate serves as a digital “passport” that authenticates the identity of the website and encrypts the data exchanged between the website and its visitors.
The primary purpose of an SSL certificate is to protect sensitive information shared on websites, such as login credentials, credit card details, personal information, and other confidential data. Without SSL encryption, this information could be intercepted and accessed by malicious third parties.
An SSL certificate provides several key benefits:
Data Encryption: SSL certificates use encryption algorithms to scramble data, making it unreadable to anyone without the decryption key. This ensures that sensitive information remains secure during transmission.
Authentication: SSL certificates verify the authenticity of the website, assuring visitors that they are communicating with the legitimate owner of the site. This helps prevent phishing attacks and instills trust in users.
Trust and Credibility: Websites with SSL certificates display visual trust indicators, such as a padlock icon in the browser’s address bar or a green address bar, depending on the type of certificate. These indicators signal to users that the website has taken measures to secure their data and enhance the website’s credibility.
SEO Benefits: Search engines prioritize secure websites in their rankings. Having an SSL certificate can positively impact your website’s visibility and search engine optimization efforts.
Types of SSL certificates
There are various types of SSL certificates available, both paid and free. We’ll discuss their differences and help you choose the right SSL certificate on WordPress.
Domain-validated (DV) SSL certificates
Domain-validated SSL certificates are the most basic type of SSL certificates and are suitable for small websites, personal blogs, or startups.
To obtain a DV certificate, the certificate authority (CA) verifies the domain ownership by emailing the domain owner or checking a specific DNS record. DV certificates are typically issued quickly and are a cost-effective option for establishing basic encryption on a website.
Organization-validated (OV) SSL certificates
Organization-validated SSL certificates provide a higher validation level than DV certificates.
In addition to verifying domain ownership, the CA performs a manual verification process to confirm the organization’s identity. This involves validating the organization’s legal existence, physical address, and telephone number. OV certificates display the verified organization’s details in the certificate information, providing visitors with other trust and assurance.
Extended Validation (EV) SSL certificates
Extended Validation SSL certificates offer the highest level of validation and are often used by e-commerce websites, financial institutions, and other organizations prioritizing security and customer trust.
The validation process for EV certificates is more rigorous and involves verifying the legal and physical existence of the organization, along with conducting thorough background checks. Websites with EV certificates display the organization’s name and address when clicking the padlock.
Wildcard SSL certificates
Wildcard SSL certificates secure a domain and its subdomains with a single certificate. For example, a wildcard certificate issued for “*.example.com” would cover “www.example.com,” “blog.example.com,” and any other subdomain under “example.com.”
This eliminates the need to manage multiple certificates for each subdomain, making it a convenient choice for websites with numerous subdomains.
Multi-Domain SSL certificates
Multi-domain SSL certificates, or Subject Alternative Name (SAN) certificates, can secure multiple domains and subdomains within a single certificate. They are ideal for businesses with multiple websites or hosting providers managing multiple client domains.
With a SAN certificate, you can secure different domain names, such as example.com, example.net, and example.org, using a single certificate.
Free SSL certificates
Let’s Encrypt is a well-known provider of free SSL certificates, and their initiative has significantly contributed to the widespread adoption of SSL across the internet and is readily available through many hosting providers and server control panels.
Cloudflare provides free SSL certificates, too, and is a popular choice among web developers because of its CDN, WAF, and other features.
When selecting an SSL certificate type, you must assess your website’s specific requirements, budget, and level of trust and assurance you want to provide to your visitors. Each certificate type offers different validation levels, trust indicators, and features.
How to install an SSL certificate on WordPress
The installation process varies depending on where you host your website. Many hosting providers have built-in features to install SSL on WordPress websites easily. All you need to do is activate the SSL certificate and install it on the domain you want it to be. In most cases hosting providers will add the HTTP to HTTPS redirect rules, but if they do not, you can do so manually; we will discuss redirect rules later.
Method 1: Installing SSL certificates through Cloudflare
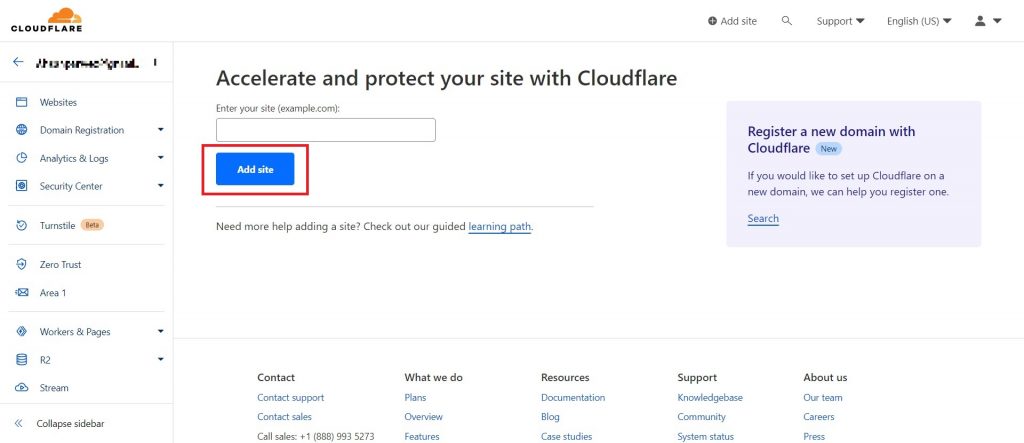
Step 1: Create a Cloudflare account.
Head over to Cloudflare’s website and sign up for a free account. Then add the website on which you wish to install SSL.
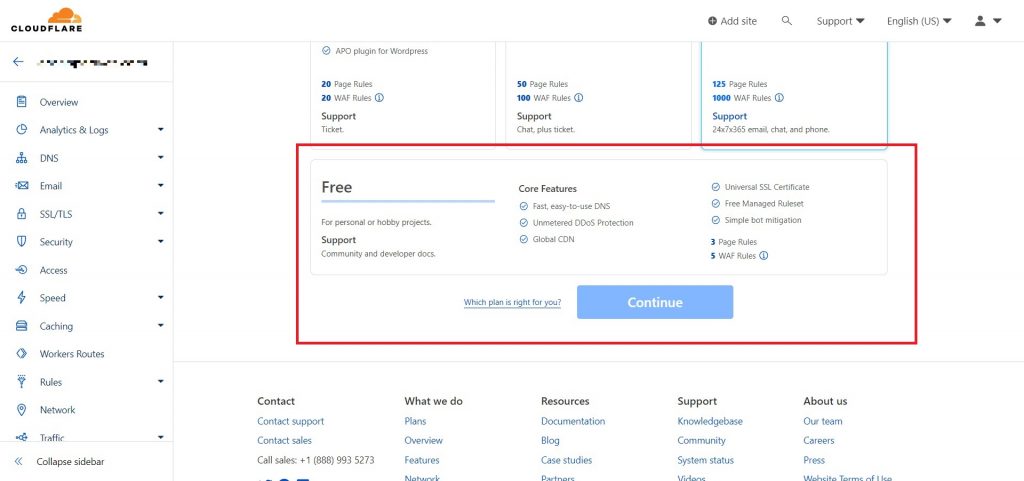
After adding your website, you will need to select a plan. SSL is included in all paid plans as well as free plans. For this tutorial, we will go with the free plan.
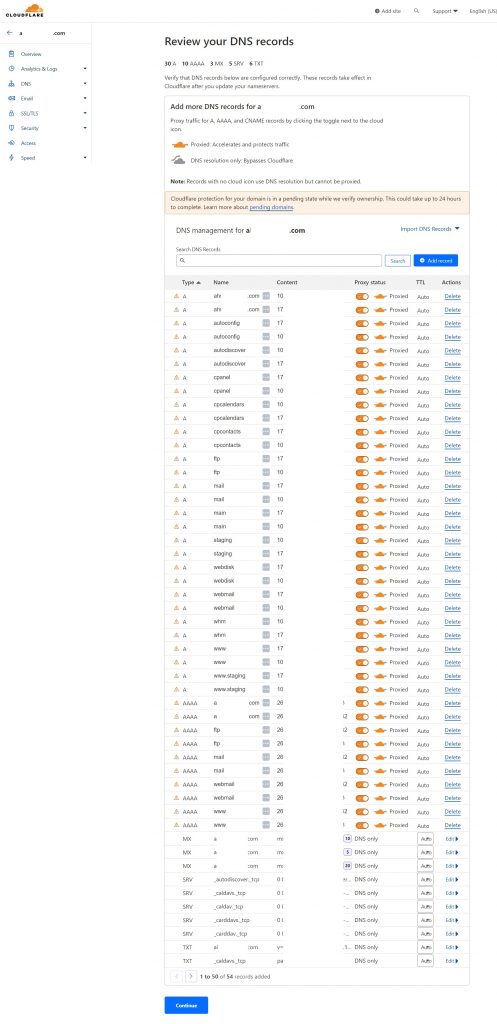
Step 2: Change the nameservers
After adding your domain, Cloudflare will ask you to change the Nameservers on your hosting server to Cloudflare Nameservers. This will redirect traffic to Cloudflare servers and route them to your hosting servers.
You can change the Nameservers in your web hosting account by finding and editing the DNS records file.
To learn more about changing the nameservers on your hosting server, we recommend you refer to the hosting provider’s official documentation.
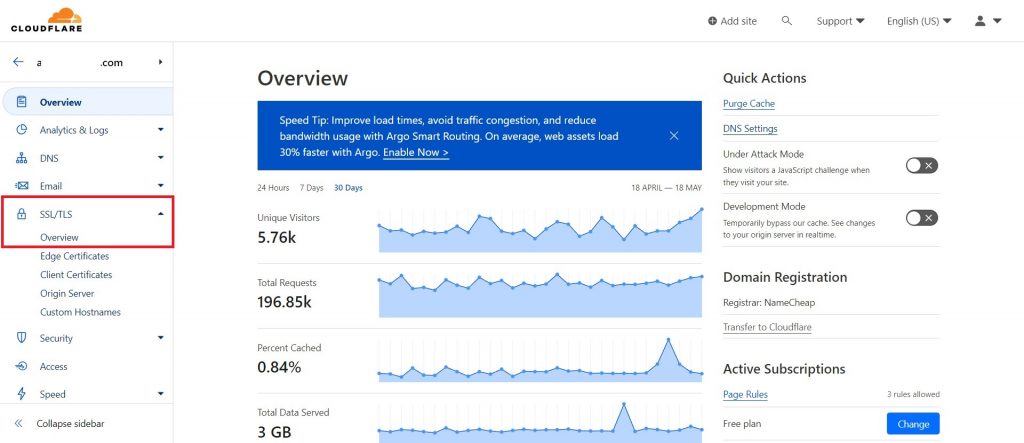
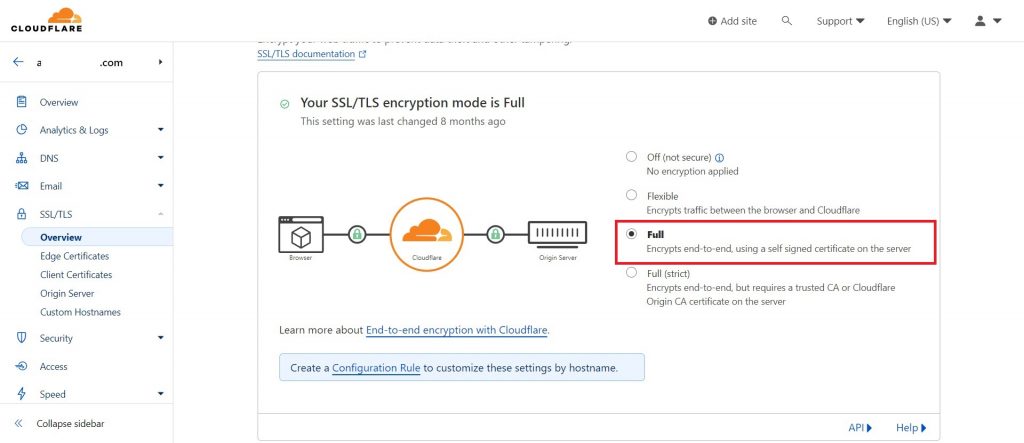
Step 3: Installing the SSL
Next, navigate to SSL/TLS settings. Here you will be presented with a few encryption options. We recommend using “Full” as it will encrypt information between your visitor’s browser and Cloudflare server and between Cloudflare Server and your hosting server.
That is it. Your website should now be accessible through HTTPs protocol.
Method 2: Use the hosting provider to install an SSL certificate
You can purchase an SSL certificate from a trusted certificate authority (CA), often offered by your hosting provider. Alternatively, you can use free SSL certificate options like Let’s Encrypt.
Some hosting providers also offer built-in SSL features or partnerships with CAs, making the installation process more seamless.
The process of installing the SSL certificate can vary depending on your hosting provider. However, the general steps involve the following:
Step 1 Access your hosting account or control panel
Log in to your hosting account, and locate the SSL or security settings section. This may be labeled as SSL/TLS, Security, or similar.
Step 2 Upload the SSL certificate:
Look for an option to upload the SSL certificate files. You’ll typically need to provide the certificate file (usually with a .crt extension) and the private key file (often with a .key extension). These files are usually provided by the CA or generated during the SSL certificate issuance process.
Step 3 Complete the installation
Follow the prompts or instructions provided by your hosting provider to complete the SSL certificate installation. This may involve specifying the domain name, confirming the certificate files, and configuring additional settings.
If you have any issues while installing the SSL certificate through the hosting provider’s built-in features, you can always ask their support to assist or read the hosting company’s official documentation.
Setting up HTTP to HTTPS redirects
Note: Before you begin, ensure you have a recent WordPress website backup. So that you can easily restore your website if anything goes wrong.
After installing the SSL certificate, setting up HTTP to HTTPS redirects is crucial. This ensures that all visitors are automatically redirected to the secure version of your website. The process varies depending on the server type.
Editing the .htaccess file (Apache Servers):
Access your website’s files using an FTP client or the file manager provided by your hosting control panel.
Locate the .htaccess file in your website’s root directory (public_html). If you can’t find it, make sure hidden files are visible.
Open the .htaccess file using a text editor.
Add the following lines of code to the file, ensuring to replace “yourdomain.com” with your actual domain name
RewriteEngine On
RewriteCond %{HTTPS} off
RewriteRule ^(.*)$ https://yourdomain.com/$1 [L,R=301]
Save the changes and upload the modified .htaccess file back to your server.
Settings for Nginx servers
If your website is hosted on a Nginx server, you will need to modify the server configuration file.
Locate the server block for your domain in the Nginx configuration file. This file is usually in the /etc/nginx/sites-available/ directory.
Add the following lines of code within the server block, replacing “yourdomain.com” with your actual domain name.
server {
    listen 80;
    server_name yourdomain.com;
    return 301 https://yourdomain.com$request_uri;
}
Save the changes and restart the Nginx server for the new configuration to take effect.
SSL Settings for LiteSpeed servers
If your website is hosted on a LiteSpeed server, you can enable HTTP to HTTPS redirects through the LiteSpeed WebAdmin interface or by modifying the server’s configuration file. We recommend that you read the official documentation to know more details.
Access the LiteSpeed WebAdmin interface provided by your hosting provider and navigate to the virtual host settings for your domain.
Look for the “General” tab or section and find the “Rewrite” option.
Enable the rewrite rules and specify the redirection from HTTP to HTTPS.
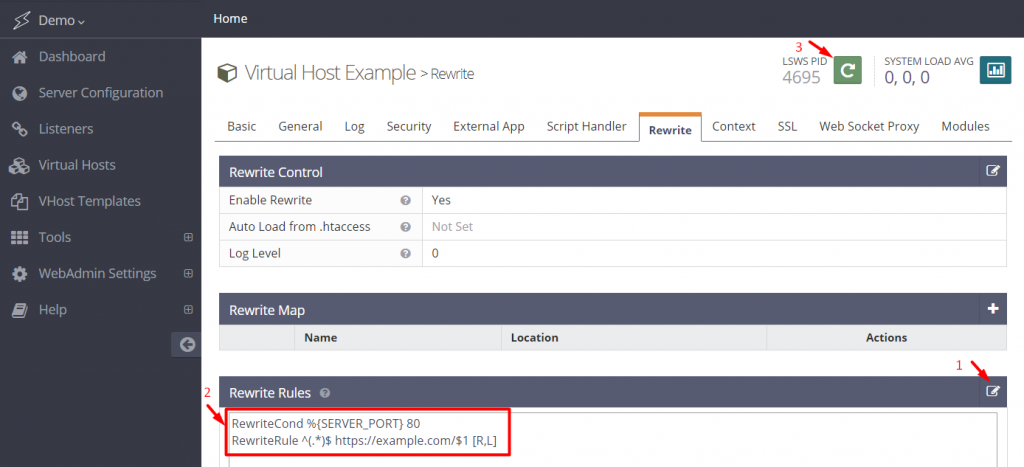
Save the changes and restart the LiteSpeed server for the configuration to take effect.
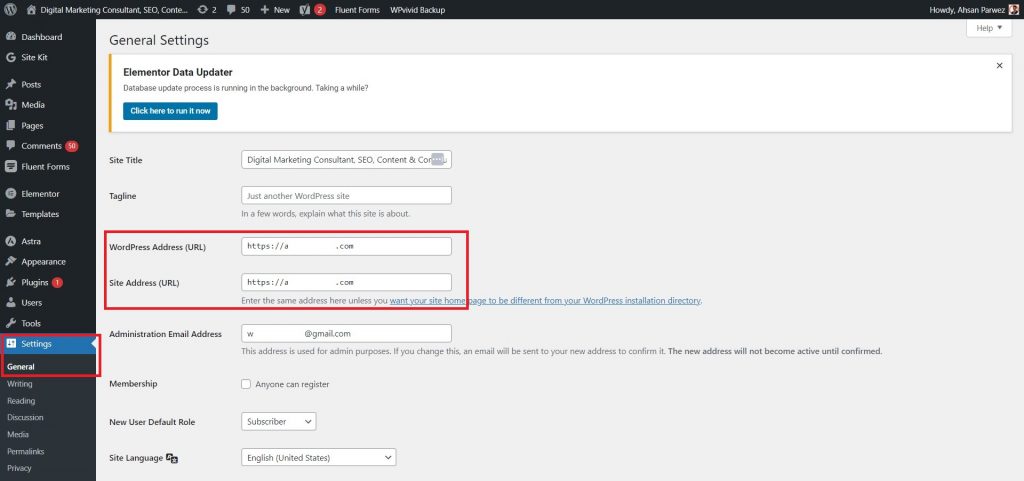
Changing the WordPress site URL
After adding the redirect rules to your web server’s configuration file, you should change the site URL in the WordPress dashboard from HTTP to HTTPS.
Verify the SSL certificate installation
After completing the installation and redirects, verifying that your SSL certificate is installed and functioning as expected is essential. Perform the following checks to validate your SSL certificates.
1. Checking the SSL certificate installation
Visit your website using the HTTPS protocol (e.g., https://yourdomain.com).
Check if the browser displays the padlock icon or a secure indicator next to the URL.
Click on the padlock or secure indicator to view the certificate details and ensure it matches your website.
2. Verifying HTTPS redirection
Access your website using the HTTP protocol (e.g., http://yourdomain.com).
Ensure that you are automatically redirected to the HTTPS version of your website.
Confirm that the URL in the browser’s address bar changes from “http://” to “https://”.
3. Running an SSL test for security and compatibility
Use online SSL testing tools such as SSL Labs (https://www.ssllabs.com/ssltest/) or Qualys SSL Server Test (https://www.ssllabs.com/ssltest/) to perform a comprehensive test of your SSL configuration.
These tools will provide a detailed report on the security and compatibility of your SSL certificate, encryption protocols used, and any potential vulnerabilities or misconfiguration.
Ongoing SSL management and maintenance
Installing an SSL certificate is just the first step. To ensure the continued security of your website, consider the following.
Setting up SSL certificate expiration reminders
SSL certificates have a validity period, typically three months to several years. Keeping track of certificate expirations is crucial to avoid website security disruptions.
Set up reminders or notifications to alert you in advance when the SSL certificate is nearing its expiration date. This can be done through calendar reminders, email notifications, or SSL management tools provided by your hosting provider.
Renewing SSL certificates before they expire
Plan and renew your SSL certificate before it expires to prevent security warnings or service interruptions.
Contact your certificate provider or follow their instructions to renew the SSL certificate. The process may involve generating new certificate files or updating the existing certificate with renewed information.
If you are using Cloudflare or a hosting provider that automatically renews your SSL certificate, then you will not need to renew your certificates manually and install them again.
Fix mixed content issues
Mixed content occurs when your website loads both secure (HTTPS) and insecure (HTTP) content. This can trigger the “Not Secure” warning in browsers. To fix mixed content issues, you will need to force HTTP to HTTPs redirection.
Plugin Assistance: Use plugins like Really Simple SSL or SSL Insecure Content Fixer to fix mixed content issues on your WordPress site.
These plugins handle the necessary URL rewriting and content modification to load all resources securely.
Manual Fix: If you prefer a manual approach, you can review your website’s source code and look for any hardcoded HTTP URLs. Update them to use HTTPS.
Also, check for insecure resources, such as images or external scripts, and update their URLs accordingly.
Update Internal Links and Resources: Review your website’s internal links and ensure they use HTTPS. This includes menu links, navigation elements, buttons, and internal URLs within your content. Update them to use the secure HTTPS protocol.
Conclusion about how to install SSL certificate on WordPress
Having an SSL certificate on WordPress installed and properly configured is a must-have security measure for any website that handles sensitive information or engages in e-commerce transactions.
Without an SSL your website will not be shown in the search results, so ensure you have a properly configured and working website that uses the HTTPs protocol.