Did you know that attackers can use several techniques to gain full access to your WordPress site if you use the default login URL? In this article, we will learn how to change the default WordPress Login URL to a custom secure URL.
At Patchstack, we’ve seen a 150% growth in vulnerabilities reported in 2021 compared to 2020 which is a significant increase. That’s a staggering number, and it shows how vulnerable your site can be if you don’t take the necessary precautions.
One of the simplest and most effective ways to protect your WordPress site from hackers is to change the default login URL to a custom secure URL. This will make it harder for even the most determined attackers to find your login page and launch brute-force attacks.
By the end of this article, you will have the technical know-how to change the default WordPress login URL to a custom secure URL. We will also provide an alternate solution that allows you to restrict access to your login page without technical expertise in just a few minutes.
Read on to find out more!
Why you should change the default WordPress login URL?
If you have been running your WordPress site for a while, there is a good chance that, whether you know it or not, your site has been regularly bombarded by brute-force attacks.
If you are using a strong password and following other industry best practices on your website, then most of the automated attacks will be foiled.
However, even if the attacker is unable to successfully log in, it can still overwhelm your server with login requests and consume precious resources. Automated attacks can last for hours at an end – and during that time, your visitors might experience slow and sluggish performance from your website.
In large part, these attacks are mostly possible because the default login URL on all WordPress websites is the same (usually yourdomain.com/wp-admin). If you change this URL to something that only you know, then it will be extremely difficult for the attacker to guess the correct URL for your login page.
If you are using a custom login URL, then rather than spending resources trying to search for the correct URL, most automated robots will just skip your site and move on to their next target.
Let’s see how to change the default login slug the old-fashioned way, and then see how Patchstack compares with this solution.
Manually changing the WordPress login URL (via SSH/FTP)
If you want to change your WordPress login URL manually, then you will need to edit the PHP files of your website, as this action can’t be done through the WordPress dashboard. Depending upon your hosting provider and configuration, this step will vary.
If your hosting provider provides a dashboard to view and edit your website(such as cPanel), then you can use that. Otherwise, if you have SSH access to your website, then you can use it to log in to your server and edit the files.
Once you get access to your server, locate your WordPress installation. In the WordPress folder, look for a file named wp-login.php – this is the file used to log in to your dashboard.
Rename this file to anything random and note it down. When renaming the file, make sure that it does not contain any spaces, and that the name ends with .php.
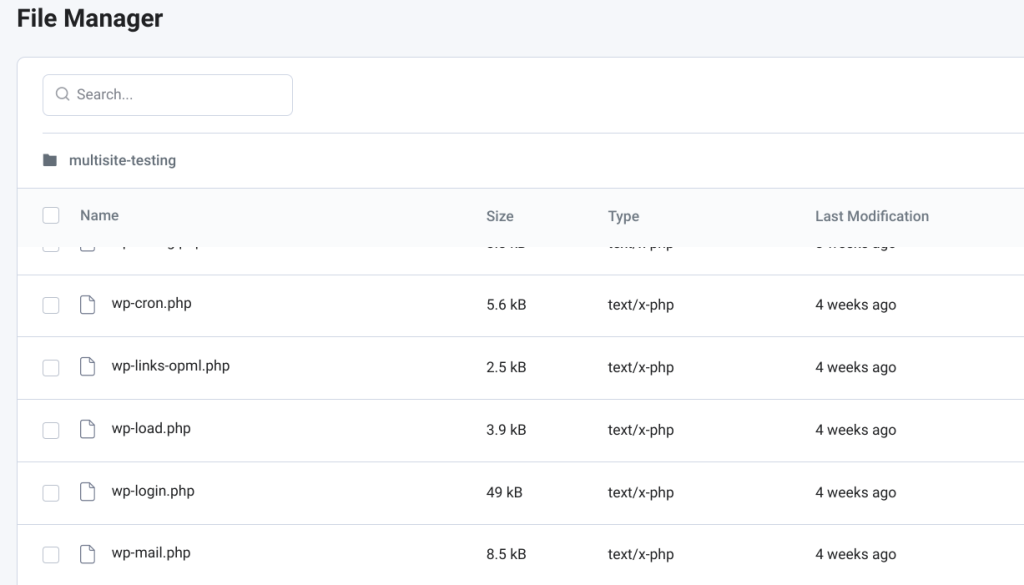
In the above screenshot, we can see a PHP file named wp-login.php; we have renamed it to wp-login-2.php for demonstration purposes. After renaming the file, open it in a text editor, and then use the built-in find and replace functionality to replace all instances of wp-login with the name that you noted down earlier.
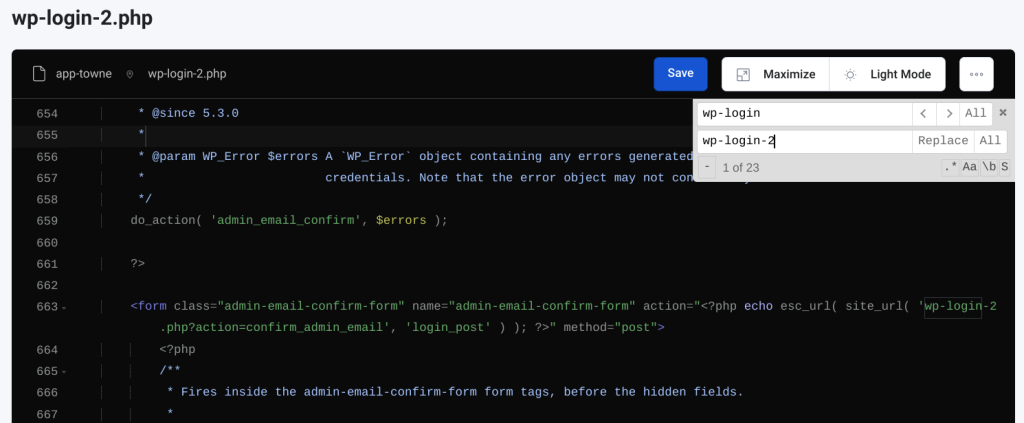
In the above example, we have replaced wp-login to wp-login-2 for simplicity. Ideally, you should pick a random alphanumeric string that is difficult to guess.
Finally, save the text file and close the text editor. You don’t need to restart your server – your website will automatically stop serving requests on the old URL and start using the new URL.
How to secure WordPress login URL via Patchstack
If you are using Patchstack, you can secure your WordPress login page with a single click directly from the WordPress dashboard.
Once you have successfully installed Patchstack on your site, go to Patchstack settings and open the “Login Protection” page.
At the top of this page, you will find an option to “Block access to wp-login.php”. Click the checkbox next to this, and note down the randomly generated string in the text box below.
You will need to visit this URL to log in to your WordPress dashboard in the future.
If you want to create a URL that is easy to memorize, then you can edit the string in the text box.
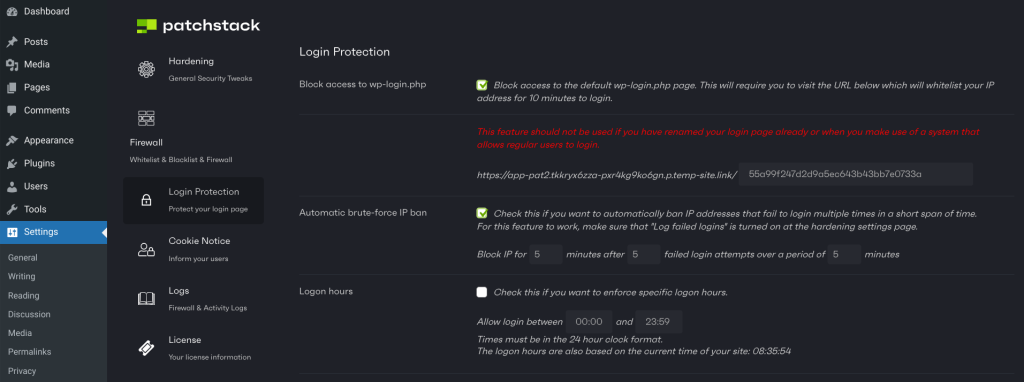
Once you have performed the above steps, you can scroll down to the bottom of the page and click ‘Save’.
That’s it! Patchstack will now block any requests that attempt to access your login page directly. Only the users who visit the given URL can access the login page.
Note: This only works if you are using the default WordPress login URL to log in to the dashboard for administrative purposes. If you are using a custom URL, or run a site that requires regular users to log in, then this feature is not suitable for you.
Final thoughts
Changing the default WordPress login URL to a custom secure URL is a good way to deter a large number of automated attacks that try to guess your username and password. However, this is not a foolproof solution, and it does not guarantee that your site will be safe from black hat hackers. A dedicated attacker who is specifically targeting your website will still be able to find your custom login URL by inspecting your site’s code, files, or database.
Therefore, you should not rely on this method alone, but use it as part of a comprehensive security strategy.
You should also implement other measures to protect your WordPress site from brute force attacks, such as blocking malicious IP addresses, limiting login attempts, using strong passwords, and updating your plugins and themes regularly. If you want to learn more about how to do this, we recommend you read the following articles:
- How To Protect WordPress Against Brute Force Attacks
- How To Block IPs, Countries, and Regions from Accessing Your WordPress Website
- How To Limit Login Attempts on WordPress (+ Should You?) – Patchstack
Patchstack scans your site for vulnerabilities, alerts you of any issues, and automatically applies virtual patches before they can be exploited. You can try Patchstack for free and see how it can improve your site’s security and performance.