In this article, you will discover how to avoid caching sensitive information in WordPress, and why it is crucial for your site's safety.
Are you using caching to boost your WordPress site's performance?
Did you know it is possible to accidentally reveal your sensitive information to unauthorized visitors by doing that?
You might think that your site is secure, but attackers can use web cache deception – a type of cyber attack that forces caching servers to store and reveal sensitive user information.
We will discuss what caching is, what types of caching solutions can be used in WordPress, and how to identify and prevent caching sensitive information in WordPress.
By the end of this article, you will be able to protect your sensitive information in WordPress and enjoy a faster and safer site.
What is caching and why do you need it?
Caching is a technique that stores a copy of the data, or the output of a process, in a temporary storage area. This could include either the memory or the disk, and by storing a copy of the data in either of these locations, it can be retrieved much faster the next time it is needed.

You might think that if caching can leak sensitive information then it is best to turn off caching, however this is not a good solution. Caching is essential for WordPress performance because it can:
- Reduce the load on the server and the database
- Improve the page loading speed and the user experience
- Save bandwidth and resources
The benefits of enabling caching cannot be overlooked, and with some careful configuration, you can prevent any personal, confidential, or valuable information from being exposed to unauthorized parties or the public.
Types of caching in WordPress
When we talk about caching, there are two main categories – server-side caching and client-side caching. The main differences between them are where the caching occurs, and who benefits from it.
Server-side caching
Server-side caching is carried out by the server on which the services are running, such as a web server or a database server.
In this method, the server stores a copy of the data in a temporary storage area on the server itself so that it can be retrieved faster the next time it is needed. These days, this data can also be stored on edge nodes using CDN technology.
Server-side caching reduces the load on the server and the database, improves the page loading speed, and the user experience, and saves both bandwidth and resources. It can benefit all users who access the website, regardless of their device or browser.
When caching data on the server, there are many different approaches that you can take, depending on the type of data that is being cached:
- An in-built caching mechanism in the database: Many modern databases offer the functionality to store the results of database queries or complex operations in the memory so that they can be retrieved faster the next time they are needed.
- Object caching: You can use this technique to store the results of database queries or PHP objects in the memory of the server so that they can be reused without querying the database or executing the PHP code again.
- Full-page caching: You can take this one step further and store the entire HTML output of a web page in the disk or the memory of the server so that it can be served directly to the user without processing the PHP code or the database queries again. Full-page caching can improve the performance of static or semi-static websites that do not change frequently or have personalized content.
Client-side caching
Client-side caching is done by the web browser or the desktop application used by the user. In this case, the browser stores a copy of the data in a temporary storage area on the user's device so that it can be retrieved faster the next time it is needed.
This can reduce bandwidth usage and network latency, and give users quicker access to the cached resources. However, this benefits only the users who have visited the website before and already have the cached resources on their devices.
How to identify what to cache?
In the previous section, we covered various techniques that can be used to implement caching for your website. Although they all speed up your site in one way or another, not all of them should be used to store all the information.
It is recommended that private information should be cached only in the user’s browser and not on a shared server. Since the browser of the user already receives all the information about the user’s account on the website, it is perfectly acceptable to cache data there.
One of the challenges of caching in WordPress is to identify which information is sensitive, and which is not. As a general rule of thumb, any information that is only visible to logged-in users should be considered private.
Sensitive information is any information that is personal, confidential, or valuable, and that should not be exposed to unauthorized parties or the public. For example:
- Personal information such as usernames, email addresses, and profile details should be treated as sensitive.
- Passwords and authentication tokens are highly sensitive
- If your website processes payments, any information related to credit cards, bank accounts, or financial transactions is highly sensitive.
Any information that is common to all users, and that does not require user authentication, can be cached on a shared cache or distributed via a CDN. For example, you can cache CSS files, JavaScript libraries, fonts, public images, etc.
Avoid caching sensitive information
You can use HTTP headers and meta tags to control the caching policy of a page or post in WordPress. These headers instruct browsers on how to handle and store the content.
HTTP headers and meta tags for caching control:
- Pragma (Deprecated): Many people use the no-cache directive with the Pragma header and think this will disable the cache. However, this is not the case.
The Pragma header is deprecated and no longer recommended for controlling caching. It was used for compatibility with HTTP/1.0 caches. We recommend you avoid using it and update the existing code if possible. - Cache-Control: The Cache-Control header is used for controlling caching behavior in both requests and responses. It supports various directives, including:
- no-cache: This directive indicates that the response can be stored in caches, but it must be validated with the origin server before each reuse. It doesn't mean "don't cache" – instead, it allows caching with revalidation.
- no-store: This directive indicates that no caches (private or shared) should store the response.
- private: Indicates that the response can be stored only in a private cache (e.g., local browser cache). This is useful for user-personalized content.
- public: Indicates that the response can be stored in a shared cache.
- no-cache: This directive indicates that the response can be stored in caches, but it must be validated with the origin server before each reuse. It doesn't mean "don't cache" – instead, it allows caching with revalidation.
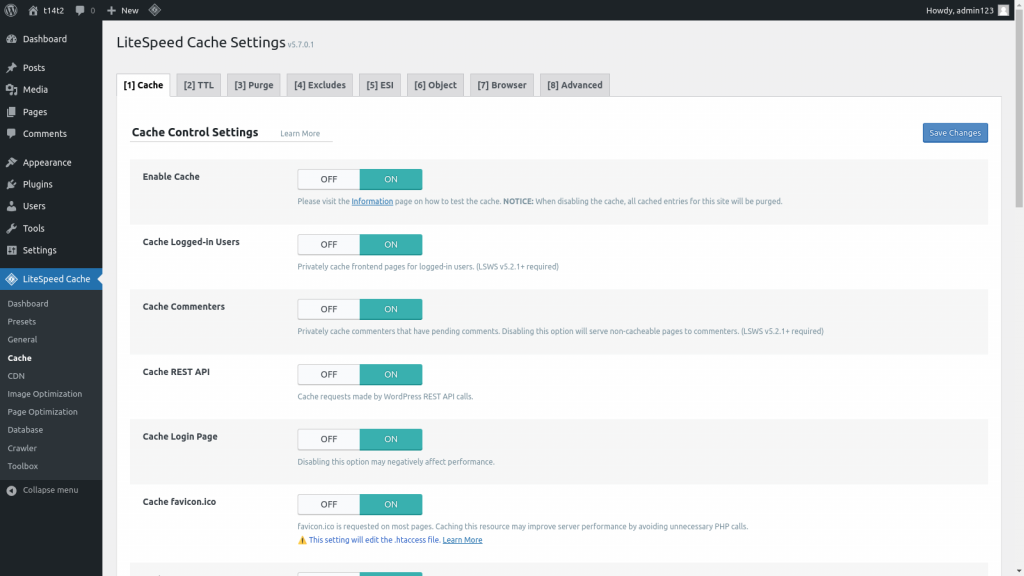
When you implement a private cache for logged-in users, you can set the maximum Time-to-Live (TTL) via the Litespeed Cache Settings > Cache admin menu.
However, there's a limitation of a 1-hour arbitrary limit for the private cache TTL. The limitation is in place to manage disk usage efficiently. The private cache is per-user-basis, and increasing the TTL could lead to an exponential growth in disk usage.
Caching using a WordPress plugin
WordPress allows you to manage your website without having to fiddle with server settings directly. This means that you can configure caching from the WordPress dashboard itself by simply using a plugin.
Many plugins can help you manage caching in WordPress, such as WP Super Cache, W3 Total Cache, or LiteSpeed Cache. These plugins have more or less similar settings to each other for controlling the caching behavior of your site.

As an example, in this section, you will gain an understanding of the various settings that you can tweak in the LiteSpeed Cache plugin settings to cache private data.
- Cache Logged-in Users: This setting allows you to cache the frontend pages for logged-in users privately. This means that each logged-in user will have a cache for the pages they visit, and they will not be able to see the cache of other users.
- Private Cached URIs: You have an option to specify the paths that contain sensitive information and that should not be cached publicly. For example, if you have a page that shows the user’s profile or settings, you can enter the path of that page here, and it will not be cached publicly. You can use wildcards or regular expressions to match the paths.
- Force Public Cache URIs: This setting allows you to specify the paths that should be cached publicly regardless of the other settings. For example, if you have a page that shows the same information to all users and that does not change frequently, you can enter the path of that page here, and it will be cached publicly.
- Do Not Cache URIs: On your website, you might have some pages that should not be cached at all. For example, if you have a page that shows dynamic information based on the time of the day and that changes frequently, you can enter the path of that page here, and it will not be cached.
- Do Not Cache Query Strings: A query string is the part of the URL that follows a question mark (?) and that contains parameters and values. You can specify the query strings that should not be cached. For example, if you have a page that shows different information based on the query string, you can enter the parameters of the query string here, and it will not be cached.
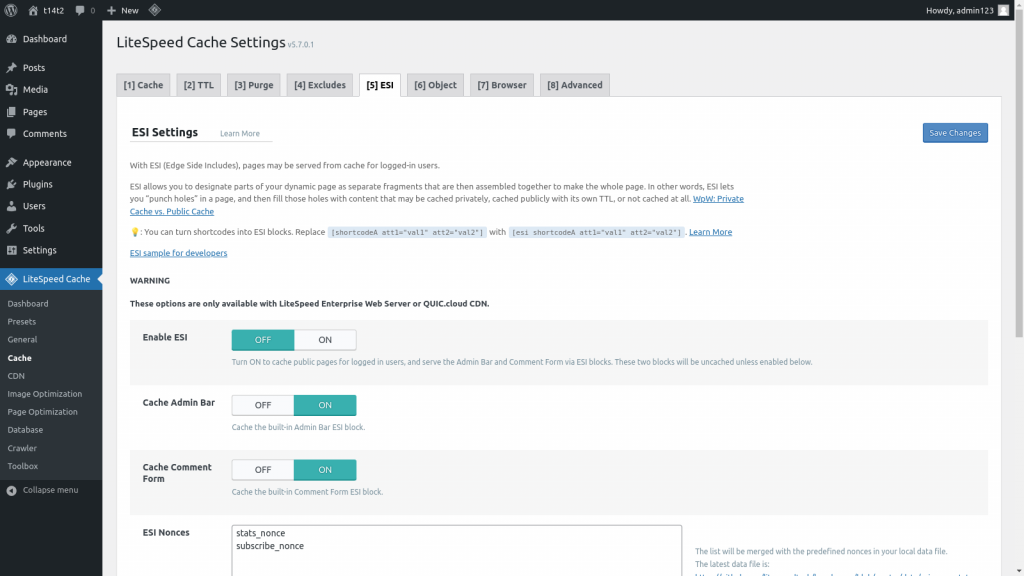
- ESI Settings: ESI is a technique that allows you to divide your page into separate fragments that are then assembled to make the whole page. For example, you can have a page that has a public header, a private sidebar, and a public footer.
With ESI, you can cache the header and the footer publicly, and cache the sidebar privately – or not cache it at all. This can improve the performance and security of your site for logged-in users. You can also turn shortcodes into ESI blocks, which means that you can cache the output of the shortcode separately from the rest of the page.

Conclusion
Caching is a powerful technique that can significantly improve your site's performance, but it can also pose a potential security risk and a privacy breach if it is not managed properly.
Therefore, it is vital to use the right tools and methods to control the caching behavior of your site and to prevent sensitive information from being leaked or stolen by hackers.
In this article, we have explained how to avoid caching sensitive information in WordPress, and why it is crucial for your site's safety and speed. We hope that this article has helped you to understand how to protect your website’s sensitive information in WordPress and to enjoy a faster and safer site.
If you are looking for a reliable and easy-to-use tool to manage security vulnerabilities in WordPress, we recommend you try Patchstack.
Patchstack alerts users immediately about security vulnerabilities found in their WordPress applications – giving you a 48-hour early warning for new vulnerabilities found by the Patchstack Alliance ethical hackers community.
Sign up to Patchstack today and enjoy a faster and safer site.


