Ensuring your WordPress backup is safe and made correctly is one of the top recommendations for ensuring your WordPress security. Multiple backups allow you to easily restore your website whenever you lose access to it, or it is hacked and taken down.
Backups are even more crucial for high-traffic and complex websites, like eCommerce stores, membership sites, or large publication websites. There are multiple ways to create backups of your WordPress websites easily; there are plugins, services, and hosting companies that provide backups as a built-in feature.
Also, for tips on how to choose a reliable and secure backup service, you can read our comprehensive ranking of the best WordPress backup plugins & services in 2024.
What does WordPress backup mean?
WordPress backups are copies of your website's data, including its files, database, plugins, and themes, created and stored as a precaution against data loss, corruption, or any other type of website-related issue.
Regularly backing up your WordPress website can help you restore it to a previous state if it gets hacked, if your server crashes if you accidentally delete something important, or if there is a software malfunction. With a backup, you can retain your website's data, which could benefit your online business or personal website.
There are various methods for backing up your WordPress website, including manual backups, automated backups with a WordPress plugin, or a backup service provided by your web hosting company. Regardless of your chosen method, storing your backup files is important to ensure they are available in an emergency.
What you need to backup for your WordPress site
To ensure that your WordPress website is fully backed up, you should include the following items in your backup process:
Files: This includes all the files that make up your website, including the WordPress core files, theme files, and plugin files.
Database: Your WordPress database contains all the content of your website, including posts, pages, comments, and user data. It's important to back up your database regularly to ensure you keep all important data.
Media: Any images, videos, or other media files uploaded to your WordPress website should also be included in your backup process.
Plugins and Themes: If you have installed any third-party plugins or themes, including them in your backup process is important. It will ensure you have a copy of all the customizations you've made to your website.
Method#1: Use your web hosting provider to create WordPress backup
Most of the hosting providers have the option to create backups of your websites either manually or schedule them. Some managed WordPress hosting providers go as far as creating and storing backups on a third-party server, such as Amazon S3.
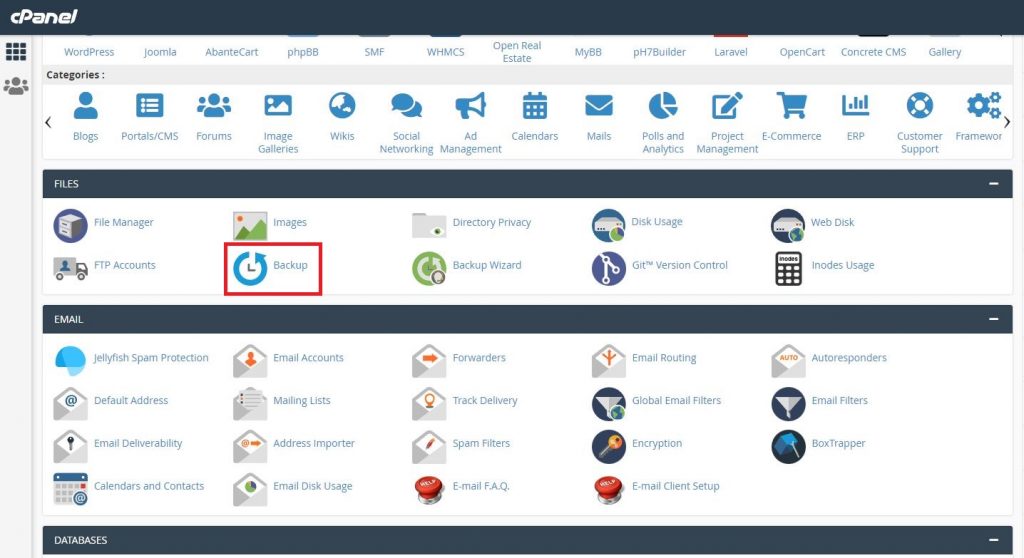
The process for backing up your WordPress site will vary depending on your web host. But if you use a hosting server that uses cPanel or Plesk, you can easily find the options in their dashboards.
You should also talk to your hosting provider to help create a backup policy. Some hosting providers will even help you restore your WordPress website from the backups they have.
If you are managing backups through the hosting provider, here are the steps that you should follow.
Step#1: Accessing the hosting dashboard
Access the management interface of your web host or dashboard. It is typically accessed through your web browser and requires your login credentials.
Look for a section related to backups. Depending on your web host, this may be called "Backups," "Site Backups," or something similar.
Step#2: Creating the backups
Choose to create a backup of your WordPress site. It may be a one-click backup option, or you may need to select specific files and folders to include in your backup.
Set your backup preferences. You can choose the frequency of backups, the location where backups are stored, and the format in which they are saved.
Initiate the backup process. It may take some time, depending on the size of your website and the speed of your web host's servers.
Verify that your backup was successful. Check where your backup was saved to ensure all your website's files and data were included.
Finally, consider backing up any configuration files you have modified, such as the wp-config.php file. These files can contain important settings specific to your website and can be difficult to recreate if lost.
By backing up all of these components, you can be sure that you have a complete backup of your WordPress website and can easily restore it if something goes wrong.
Why you should have WordPress backups in multiple places?
While making backups of your WordPress website, it is best to consider where your backups will be saved.
- On the hosting server
- On a third-party server
- On cloud storage service
Many hosting companies allow you to create backups directly on the same server your website is hosted, but if your entire server goes down, you will lose access to your backup files as well.
Some hosting companies have more options for creating the backups, like on a third-party server or your cloud storage account, e.g., Google Drive. We recommend that you at least have your backups saved in two separate places, that is, on the local server and a third-party service.
Restoring from the local backup can be the fastest, but when losing the server, you can download the backup from your third-party storage and host the site on a new server.
Method#2: Use a WordPress plugin to create backups
Using plugins to create backups is possible, but it can be a slow process as it stresses your server resources, and the chances of failure to create a backup completely are higher when compared to how hosting companies create the backups.
You can find a lot of free backup plugins on the WordPress.org repository here. Two of the popular choices are UpdraftPlus and WPVivid. No matter which plugin you use, the method of creating backups is pretty straightforward, as these plugins automate the process of creating backups of your website's files, database, and media files to your designated backup location.
All these plugins guide you through each step, and then you can manually create new backups whenever you want, or you can schedule the backups.
Plugins like UpdraftPlus and WPVivid allow you to select the destination to save the backup files, be it your Google Drive, DropBox, pCloud, or the local hosting server.
We are going to use WPVivid to create a backup in this tutorial.
Step#1: Installing the Plugin
Log in to your website’s WordPress dashboard and navigate to Plugins > Add New, search for WPVivid, and install and activate the plugin named “Migration, Backup, Staging – WPvivid”

After installation, navigate to “WPVivid Backup” from your WordPress dashboard's left sidebar. You will see a lot of options that this plugin has to offer.
Step#2: Creating Your First Backup
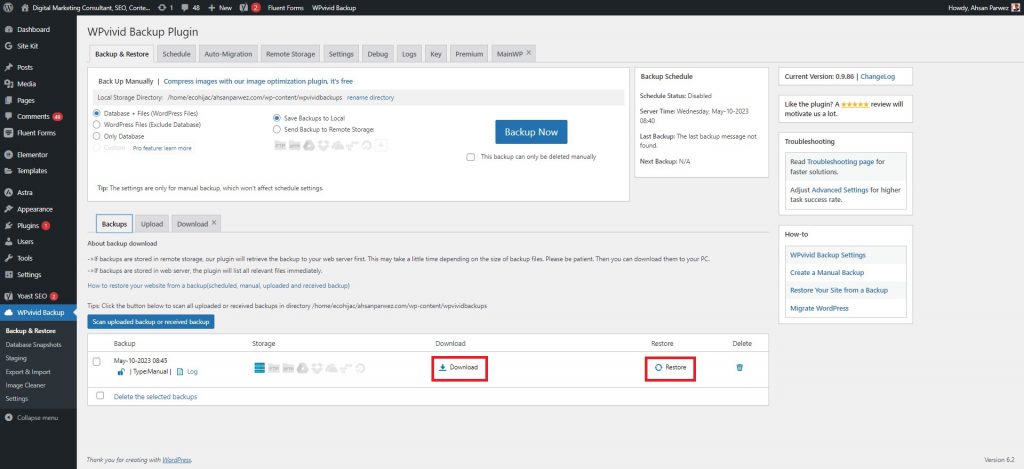
Creating manual backups with WPVivid is easy with a click of a button. To create one, select the options “WordPress Files + Database” and “Save to local”, and click “Backup Now”. This will create a full website backup inside a folder on your hosting server.
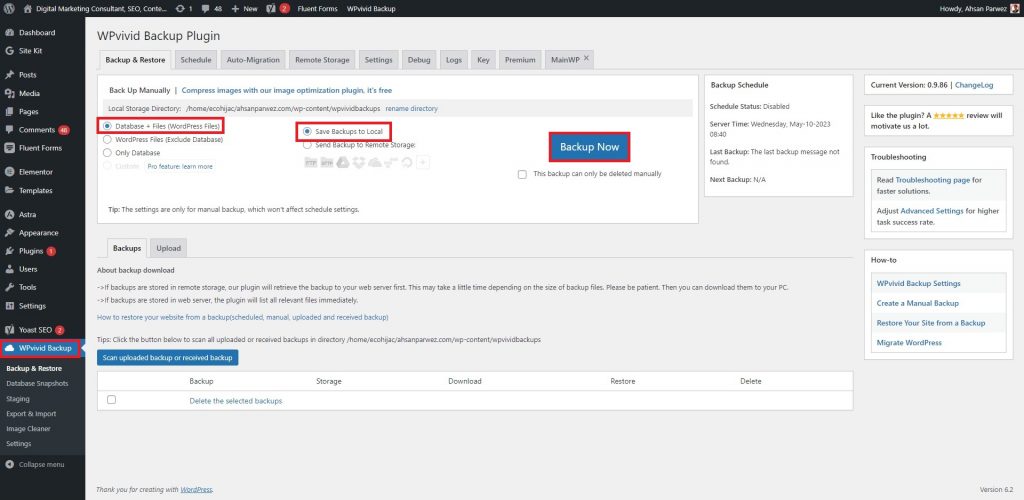
The plugin will automatically start creating a backup file that is also compressed and will be saved in a folder. The folder location will be mentioned, as highlighted in the screenshot below.

The time to create the backup depends on the size of your website and the server resources.
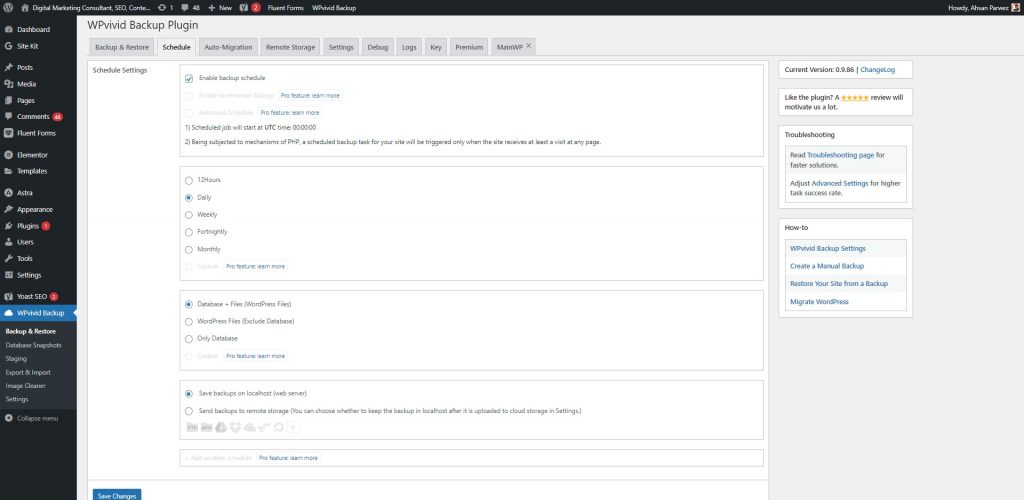
Step#4: Scheduling Automatic Backups
If you manage multiple websites or a large website, scheduling backups when your website is less busy than usual is recommended. You can find out through Google Analytics or Traffic logs of your website and see when your website has less traffic and schedule a backup at that time.
While creating a backup of your WordPress website, the performance of your website will be affected. Since the backup process will utilize server resources.
To schedule a backup with WPVivid, navigate to WPVivid Backup > Schedule tab, and select the frequency at which you want to create automated backups.
Step#5: Restoring From a Backup
To restore a backup, you will first need to have the compressed backup files that WPVivid created. You can easily restore your WordPress website to a previous version by uploading the backup file under the “Backup and Restore” tab or clicking the “Restore” icon.
That is it, creating, managing, scheduling, and restoring WordPress backups is easy with WPVivid or similar plugins. These plugins help you save a lot of time on your maintenance tasks and give you an added sense of security.
Method#3: Creating manual WordPress backups
It is good to know how to create backups of your WordPress websites manually; this method is useful if you want to backup some files, all files, the database, or both.
Backup WordPress Files Manually: Connect to your website using FTP or File Manager from cPanel or any other hosting control panel. Once connected, download all your WordPress website files to your local computer. It includes your WordPress core files, theme files, plugin files, and any other files that you have customized.
It will take some time to download all the files and folders, depending on your internet connection speed and the hosting provider.
Backup WordPress Database: Next, you need to create a WordPress database backup. You can do this by logging in to your hosting account and accessing the phpMyAdmin tool. Select your WordPress database, then click the "Export" button. It will export your database as a .sql file.
Save Files and Database Backup: Save both the files and database backup in a secure location on your computer or an external hard drive. A secure storage location for your backups is essential.
By following these steps, you will have a complete WordPress site backup. To restore your website from the backup, upload your WordPress files to your web server and import your database backup using the phpMyAdmin tool.
It's important to note that manually backing up your website can be time-consuming and requires technical knowledge. You can also use a WordPress plugin or a backup service provided by your web host to automate the backup process and simplify the restore process in case of any issues.
How frequently should you back up WordPress?
Regular backups are advised to be made of a WordPress website to prevent data loss in case of any unforeseen issues. The frequency of backups can depend on factors such as the frequency of changes made to the website, the size of the website, and the level of risk associated with data loss.
A general guideline is to take backups daily, but more is needed for some websites. For websites with frequent updates, taking days or even hourly backups may be necessary. On the other hand, for websites that are updated infrequently, weekly or monthly backups may suffice.
Additionally, it is advisable to take a backup before making any significant changes to the website, such as updating the WordPress core, themes, or plugins. That ensures you have a recent backup if any issues arise after the update.
In summary, the frequency of backups depends on the individual website's needs and risk tolerance. It's essential to evaluate the website's frequency of changes and potential risks and adjust the backup frequency accordingly.
How to choose a reliable WordPress backup
Choosing a reliable WordPress backup solution is critical to ensuring your website's data is secure and easily recoverable during a disaster. While Here are some key factors to consider when selecting a backup solution:
Automatic Backups: Choose a backup solution that offers automatic backups regularly so you don't have to worry about forgetting to do it yourself.
Incremental Backups: A good backup solution should perform incremental backups, meaning it only backs up the changes made since the last backup. This approach reduces backup times and storage requirements.
Backup Frequency: Look for a backup solution that allows you to customize the frequency of backups to match your website's needs. For example, a site with frequent updates may require daily backups, while a less active site may only need weekly or monthly backups.
Backup Location: It's crucial to store your backups securely. Choose a backup solution that stores backups on a remote server, cloud storage, or external device.
Easy Restoration: A reliable backup solution should make it easy to restore your website if something goes wrong. Look for a solution that offers one-click restores or easy-to-follow instructions.
Reputation and Support: Choose a backup solution with a good reputation and responsive support. Look for reviews and customer feedback to ensure you're selecting a trustworthy backup solution.
In summary, consider features such as automatic and incremental backups, customizable backup frequency, secure backup storage, easy restoration options, and the reputation and support of the backup solution when selecting a reliable WordPress backup.
Conclusion
Regular backups of your WordPress website are crucial to ensure that your data is secure and easily recoverable in case of unforeseen issues. Think about elements when choosing a backup strategy.
Automatic and incremental backups, customizable backup frequency, secure backup storage, easy restoration options, and the reputation and support of the backup solution.
By choosing a reliable backup solution and customizing backup frequency to match your website's needs, you can help ensure that your website's data is safe and recoverable. Remember to periodically test your backup and restoration process to ensure it works correctly.