This blog post is about the JetElements For Elementor plugin vulnerability. If you're a JetElements For Elementor user, please update the plugin to at least version 2.6.11.
✌️ Our users are protected from this vulnerability. Are yours?
Identify vulnerabilities in your plugins and get recommendations for fixes.
Request auditProtect your users, improve server health and earn additional revenue.
Patchstack for hostsAbout the JetElements For Elementor Plugin
The plugin JetElements For Elementor (versions 2.6.10 and below, premium version), which is estimated to have around 300,000 active installation, is suffering from an authenticated RCE vulnerability. The JetElements For Elementor plugin is known as the more popular Elementor addon premium plugin in WordPress. This plugin is developed by Crocoblock.

This plugin is a premium Elementor addon plugin that helps to add and customize any content on the website. This plugin contains 40+ widgets to create designs, as well as static and dynamic content elements. Most of the widgets support dynamic fields from JetEngine.
The security vulnerability
The JetElements For Elementor plugin suffers from an authenticated Remote Code Execution where user with a minimum role of Contributor able to execute arbitrary PHP function to achieve code execution. The described vulnerability was fixed in version 2.6.11 and assigned CVE-2023-39157.
The underlying vulnerability exist in the render_meta function:
public function render_meta( $position = '', $base = '', $context = array( 'before' ) ) {

    $config_key    = $position . '_meta';
    $show_key      = 'show_' . $position . '_meta';
    $position_key  = 'meta_' . $position . '_position';
    $meta_show     = $this->get_attr( $show_key );
    $meta_position = $this->get_attr( $position_key );
    $meta_config   = $this->get_attr( $config_key );

    if ( 'yes' !== $meta_show ) {
        return;
    }

    if ( ! $meta_position || ! in_array( $meta_position, $context ) ) {
        return;
    }

    if ( empty( $meta_config ) ) {
        return;
    }

    $result = '';

    foreach ( $meta_config as $meta ) {

        if ( empty( $meta['meta_key'] ) ) {
            continue;
        }

        $key      = $meta['meta_key'];
        $callback = ! empty( $meta['meta_callback'] ) ? $meta['meta_callback'] : false;
        $value    = get_post_meta( get_the_ID(), $key, false );

        if ( ! $value ) {
            continue;
        }

        $callback_args = array( $value[0] );

------------------------- CUT HERE -------------------------

        if ( ! empty( $callback ) && is_callable( $callback ) ) {
            $meta_val = call_user_func_array( $callback, $callback_args );
        } else {
            $meta_val = $value[0];
        }
------------------------- CUT HERE -------------------------
Note that there is a call for PHP built-in function call_user_func_array with supplied input parameters $callback and $callback_args. Basically, the function will call any function we supply in the $callback parameter and will pass the $callback_args as the arguments of the called function.
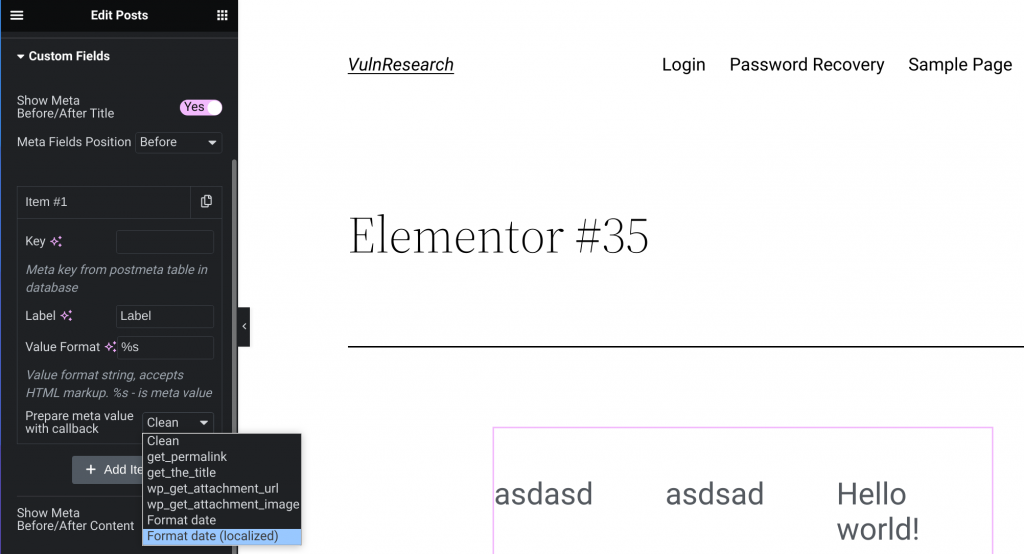
The render_meta function itself could be called in the posts widget if user decide to "Show Meta" on the "Custom Fields" of the posts widget setting:

In the "Show Meta" feature, we could specify meta key, label and a callback function that will be used to prepare the meta. As we can see, there are multiple default options such as get_permalink and get_the_title function.
If you have familiarized yourself with Elementor data structure, all of the particle and element data of a post or page will be stored in the post meta with _elementor_data as the meta key. This _elementor_data will also contain the "Label" value that we specified on the "Show Meta" feature.
Back to the initial render_meta function, note that the $callback parameter is coming from $meta['meta_callback'] which a user can fully control, since there is no check being applied on which callback the user could use. For the $callback_args parameter, it's coming from the $value variable that is originally constructed from get_post_meta( get_the_ID(), $key, false ). Since $key in this case is fetched from $meta['meta_key'] which we can also fully control, we can specify any post meta key in which we can partially or fully control to achieve RCE.
Summarizing all of the details, we can simply supply the callback function with PHP system or shell_exec function, set the meta key to _elementor_data and finally put our injected OS command in the "Label" of the "Show Meta" feature. In order to activate the RCE, the drafted post need to be published by privileged user. The RCE will then be triggered each time the post is visited.
The patch
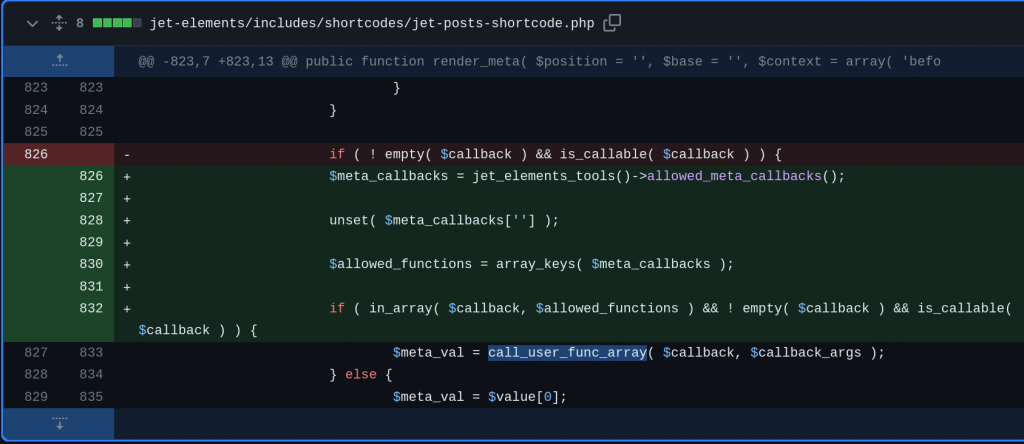
For fixing the issue, simply use a whitelist check on the callback function that can be used should be enough to patch the vulnerability. The vendor decided to create a wrapper function allowed_meta_callbacks that returns a list of allowed functions and only allows callback functions that are in the allowed list. The patch can be seen below:


Conclusion
In some cases, a theme or plugin needs to have a feature for the user to be able to call a custom or chosen function to execute. Doing so, a built-in PHP function can be used to achieve this with functions such as call_user_func or call_user_func_array. Keep in mind to always restrict the callback function that can be used and additionally also check the arguments that will be passed. We recommend using a whitelist check instead of blacklist check to prevent more cases of arbitrary function execution.
Timeline
🤝 You can help us make the Internet a safer place
Streamline your disclosure process to fix vulnerabilities faster and comply with CRA.
Get started for freeProtect your users too! Improve server health and earn added revenue with proactive security.
Patchstack for hostsReport vulnerabilities to our gamified bug bounty program to earn monthly cash rewards.
Learn more


