In this article, you can learn how to disable PHP execution and directory browsing in WordPress to enhance your WordPress site security.
Many attackers deploy automated robots on the internet to scan and exploit vulnerabilities on the internet. The exploitation process becomes easier if they have relevant information about the website such as what plugins and themes are being used on the website.
A popular way to gain this information is by browsing web directories. This information is then checked against publicly available information about software bugs and used to exploit vulnerabilities and execute malicious code.
If you are managing a WordPress website, your website may have enabled both directory browsing and PHP execution in your web server settings. This means that anyone can view the contents of public directories on your server – and run any PHP script stored in it.
This can be useful for WordPress users and developers who want to test, debug, or customize their WordPress sites. However, this can also be dangerous if this is not configured properly.
Hackers or malicious users can exploit directory browsing and PHP execution to:
- Inject malicious code into WordPress files.
- Access or modify WordPress databases.
- Discover the locations of important files or folders.
- Download or delete WordPress files or folders.
In this article, you will learn how to disable both directory browsing and PHP execution in WordPress for better security. You will also learn the benefits and risks of these features and how to manage them safely and effectively.
Are you ready to secure your WordPress site from hackers? Then read on!
What is PHP execution?
By default, WordPress uses the server’s file permission settings. In a typical setup, WordPress might need to write permissions for certain directories (such as the wp-content/uploads directory for media uploads) for the user under which the web server process runs.
This is necessary as it enables WordPress to function properly and efficiently, as most of its core features rely on PHP scripts. WordPress uses PHP scripts to process forms, generate dynamic pages, and interact with databases.
Having the PHP execution functionality allows WordPress to create dynamic web pages that change according to the user’s needs. This also allows WordPress users to customize and extend their sites with plugins, themes, and custom code. These provide developers with flexibility and control over their sites, as they can use PHP scripts to create or modify any functionality they want.
However, if any user on your site uploads a PHP file with malicious code, then it will be possible for them to execute the malicious code on your server by merely visiting the page URL.
There are many ways for attackers to do this. However, uploading malware in the file upload form is by far the most common method used.
If a malicious hacker can execute arbitrary code snippets on your server, then they will try to gain complete control over your database, and possibly even lock you out of your servers.
This is why it is strongly recommended to turn off PHP execution in user-writable directories. Doing so will instruct your server to treat PHP files in the specified directory as text files rather than executable ones. Other file types, such as images or videos, will still be served in their intended format.
How to Disable PHP Execution in WordPress
There are multiple ways to disable PHP execution in WordPress directories:
Editing .htaccess files:
Before you edit the .htaccess file, you should be aware that editing the .htaccess file in the root directory, or any of the core WordPress directories (such as wp-admin or wp-includes), may cause your site to stop working.
This is because these directories contain essential files and settings that WordPress needs to function properly. Therefore, you should only edit the .htaccess file in these directories if you know what you are doing and have a backup of your site.
You should only edit the .htaccess file in those folders where you don’t want to allow any PHP file to be executed, such as your wp-content/uploads folder. This will prevent malicious users from uploading and running PHP scripts on your server. If there is no .htaccess file in these folders, you can create one manually using a text editor or a file manager.
If the configuration file already exists, you can edit it directly, but we recommend you make a copy of your .htaccess configuration file. If you encounter any errors or issues, you can either revert the changes or restore the backup of your .htaccess file.
To edit the .htaccess file in a text editor, first connect to your server using FTP or SSH and navigate to the folder where you want to configure the .htaccess file. Open the .htaccess file in a text editor and edit it using one of the following methods:
Method 1
You can use the following code snippet to prevent direct access to PHP files on a web server. It means that any file that has a .php extension will be denied from all requests, regardless of the source or destination. This can be useful for security reasons, such as protecting sensitive configuration files or scripts that are not meant to be executed by the web browser.
The Files directive matches files based on their names and can use wildcards like * to match any character. The deny from all directive denies access to the matched files from all hosts and domains. This overrides any other access control settings that might be defined in the .htaccess file or elsewhere.
<FilesMatch "\.+(?i:php|phtm)$"> deny from all </FilesMatch>Method 2
Alternatively, you can set the php_flag variable in the .htaccess file to turn off PHP parsing. It means that any file that has a .php extension will not be executed by the PHP engine, but will be treated as plain text or another content type, depending on the server configuration.
The previous method prevents Apache from invoking the PHP handler for the matched files, but it doesn’t affect the PHP engine itself. If a PHP script is included or required by another script that is executed by the PHP engine, it will still run regardless of the .htaccess settings. The php_flag engine off directive, on the other hand, disables the PHP engine completely for the matched files, making them inaccessible to any PHP script.
php_flag engine offAfter editing, save the file and upload it back to your WordPress site, overwriting the existing file. That’s it! You have successfully blocked the execution of arbitrary PHP code on your website.
Test your site by visiting a URL that contains a blocked PHP file, such as https://example.com/wp-content/uploads/test.php. You should see an error message instead of the PHP output.
What is directory browsing?
When you publish a website on the internet, anyone can see its contents. This includes resources such as images, audio clips and other published content, including CSS and JS files.
Usually this is not a concern, as most of this content would be freely accessible via your site anyway. However there is some content that needs to be available on the internet but not freely accessible.
Directory browsing is a feature of web servers that allows anyone to see and manage the files and folders of a website, such as WordPress. WordPress stores its files in different folders, including wp-content, wp-includes, wp-admin, and more. These folders contain the files that make up your WordPress site, such as images, themes, and plugins.
When directory browsing is enabled on a web server, anyone can access these folders and files by typing their URLs in the browser. For example, if you type example.com/wp-content/ in the address bar of your browser, you will see a list of all the files and folders inside the wp-content folder of example.com.
This can help WordPress developers debug and fix their sites, as they can check the structure and layout of their files and folders. You can also see the names, sizes, types, and dates of these files and folders.

However, enabling directory browsing can also have some serious drawbacks for WordPress users:
- It can expose WordPress users to security risks, as hackers or malicious users can find and access sensitive files or folders, such as .htaccess, or backup files.
- It can affect WordPress users’ privacy and reputation, as anyone can see what files or folders they have on their site, such as personal images, confidential documents, or unused plugins.
- Even if your website does not store confidential information, hackers can still abuse directory browsing to gather important information which can be used to exploit vulnerabilities in your site’s plugins, themes, or even your hosting server.
Therefore, we strongly recommend turning off directory browsing functionality on your WordPress websites.
How to Disable Directory Browsing in WordPress?
Here are a few ways to disable directory browsing in WordPress directories:
Configuring Apache Using The .htaccess File:
Connect to your WordPress site using an FTP client or a file manager app in your hosting control panel. Locate the .htaccess file in the root folder of your WordPress site and make a backup copy of the file in case something goes wrong. Open the .htaccess file in a text editor and add the following line at the end of the file:
Options -IndexesIf someone tries to access a folder that does not have an index file (such as index.html or index.php), they will see a 403 Forbidden error message instead of a list of files and folders.
Alternatively, you can also use the <Directory> or <Files> directives to disable directory browsing for specific directories or files. For example, if you have the following code in your .htaccess file:
<Directory /wp-content> Options -Indexes </Directory> This will mean that directory browsing is disabled only for the wp-content folder and its subfolders. If someone tries to access example.com/wp-content/, they will see a 403 Forbidden error message, but if they try to access any other directory such as example.com/wp-includes/, they will still see a list of files and folders.
Save the file and upload it back to your WordPress site, overwriting the existing file.
Configuring Nginx
You can also edit the Nginx configuration files to display a directory listing when navigating to a particular directory on a website. To disable directory listing in Nginx, you need to use the ngx_http_autoindex_module, which processes requests ending with the slash character (/) and produces a directory listing.
You can disable this module by adding the autoindex off; directive inside the location directive that matches the directory you want to list. For example, if you want to disable listing the files and folders under the /files directory, you can use the following configuration:
location /files {

    autoindex off;

}
This will make Nginx block requests when you access example.com/files/ in your browser.
Configuring Apache
If you are using the Apache server, you can also edit the main configuration file of Apache to disable directory browsing. The configuration file is usually located at /etc/httpd/conf/httpd.conf or /etc/apache2/apache2.conf. Locate this file in your system and open it in a text editor, such as nano, to edit the configuration.
In Apache, the directory listing is managed by the mod_autoindex module. Once you open the configuration file, you need to edit the options directive by adding the following code snippet to your file.
<Directory "path/to/directory">

  Options -Indexes

</Directory>
In the above snippet, make sure to replace path/to/directory with the location of your web application; on most servers, this would be /var/www/html.
If you want to set this configuration at the server level and completely ignore individual .htaccess files, then you can add AllowOverride None directive to the above config. Once you have finished editing the config file, save it and restart Apache.
Using Patchstack
Patchstack can disable file indexing for you automatically, along with many other security settings, right out of the box. You can also customize these settings according to your needs and preferences. For example, you can use Patchstack to:
- Prevent default WordPress file access: This setting blocks direct access to files such as license.txt, readme.html and wp-config.php, which contain important information about your WordPress installation and configuration.
- Block access to the debug.log file: This setting prevents anyone from accessing the debug.log file that WordPress creates when debug logging is enabled. This file can contain sensitive data or errors that can be exploited by hackers or malicious users.
- Disable index views: This setting disables the directory and file listing for your entire site. This means that if someone tries to access a folder that does not have an index file (such as index.html or index.php), they will see a 403 Forbidden error message instead of a list of files and folders.
- And much more…
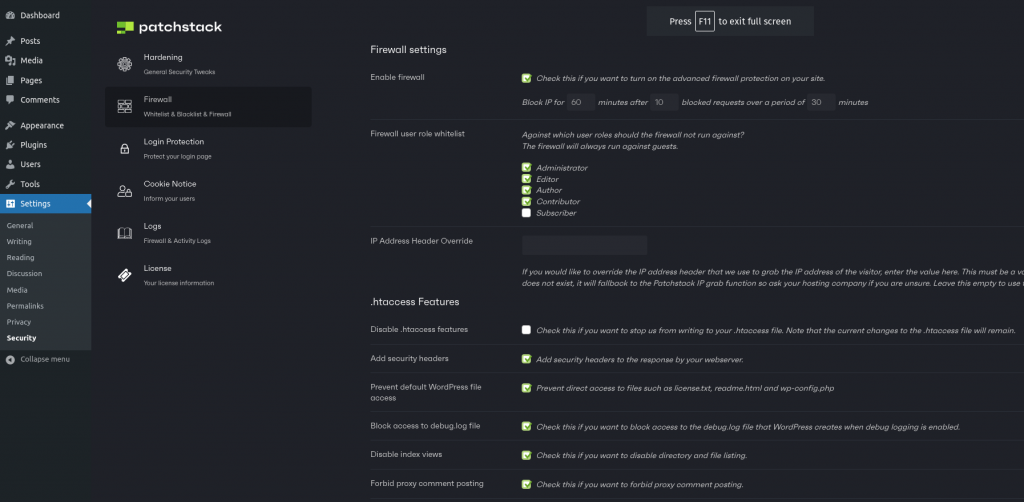
To use Patchstack to disable file indexing, you’ll need to install and activate the Patchstack plugin on your WordPress site. Then, you can go to the Firewall tab of your Settings page and confirm that the directory listing is disabled. You can also enable or disable other security settings from there.
Conclusion
Disabling PHP execution and directory browsing is a simple, easy step you can take to secure your WordPress website – a step that should be among the first you take to ensure the security of your site, your data, and your privacy. That said, it is one of many steps and precautions you can take.
To start with, there are the ~ 60,000 plugins available on the WordPress plugin repository – several which you likely use, but only a very few actively audit their codebase for potential security issues. And this is why we built Patchstack.
Automated web application protection for site owners, developers, and agencies.
Most people working with WordPress either:
- Passively worry about their site (and whether they’re taking precautions)
- Don’t worry and take few precautions (and are the most at risk)
- Spend more time than they should manually secure their sites (often enterprise companies that do code reviews all manually)
Fortunately, thanks to Patchstack, you don’t have to be, as we offer:
- Notifications for new security vulnerabilities
- Automated protection with vPatches and security hardening
- Remotely managed software and updates with automation
And much, much more.
For more on WordPress security, read our complete guide to WordPress security here.
We hope you’ve found this tutorial helpful. If you have any questions for us, feel free to reach out to us. We’re happy to help. 🤝