This blog post explains how to backup WooCommerce store since having a good WooCommerce backup solution in place could potentially save your entire business one day.
With 1 in 25 WordPress sites being hacked in 2023, how long do you feel you’re happy to wait until it’s your site?
Your WooCommerce store may be vulnerable to malicious attacks from hackers. Sometimes, your website may experience errors or crashes due to various factors, such as plugin conflicts, theme updates, server issues, or human errors.
Sooner or later, some downtime is inevitable. However, you can minimize the damage caused by these attacks by backing up your WooCommerce store and database and then restoring your store to a safe state. A solid WooCommerce backup is often the best insurance policy you can have.
In the past, we have seen even the biggest of tech companies experiencing extended downtime. For example, CloudNordic, a medium-sized cloud provider, lost all the data of its customers due to a cyberattack. Similarly, customers at Atlassian, a major tech company, were unable to use its services for weeks due to a poorly implemented backup strategy.
Backing up your WooCommerce store and database is not only a smart move, but a necessity. It can protect your online business from various threats and disasters that can ruin your hard work and reputation.
In this article, we will discuss two popular ways to back up your WooCommerce store and database properly.
Let's get started!
Method 1: Backup WooCommerce manually
Step 1 - Connect to Your Server
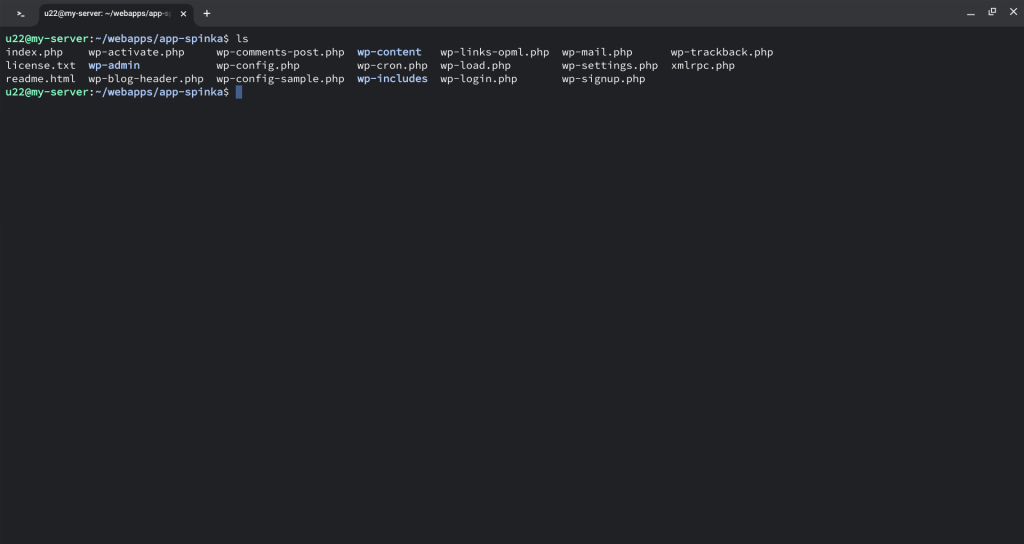
Before you back up your WooCommerce store and database, you need to connect to the server where your store is hosted. You can do this by using a secure shell (SSH) connection, which allows you to access your server’s files and commands remotely.
To connect to your server via SSH, you will need the following information:
- The hostname or IP address of your server
- The username and password of your server account
- The port number of your server’s SSH service (usually 22)
Once you’re connected, you will see a command prompt where you can enter commands to interact with your server.

You will also need access to the SQL database that is used by your WooCommerce store. This database contains all the information about your store’s settings, products, orders, and customers.
To access your database, you will need the following information:
- The name of your database
- The username and password of your database user
- The hostname or IP address of your database server (usually localhost)
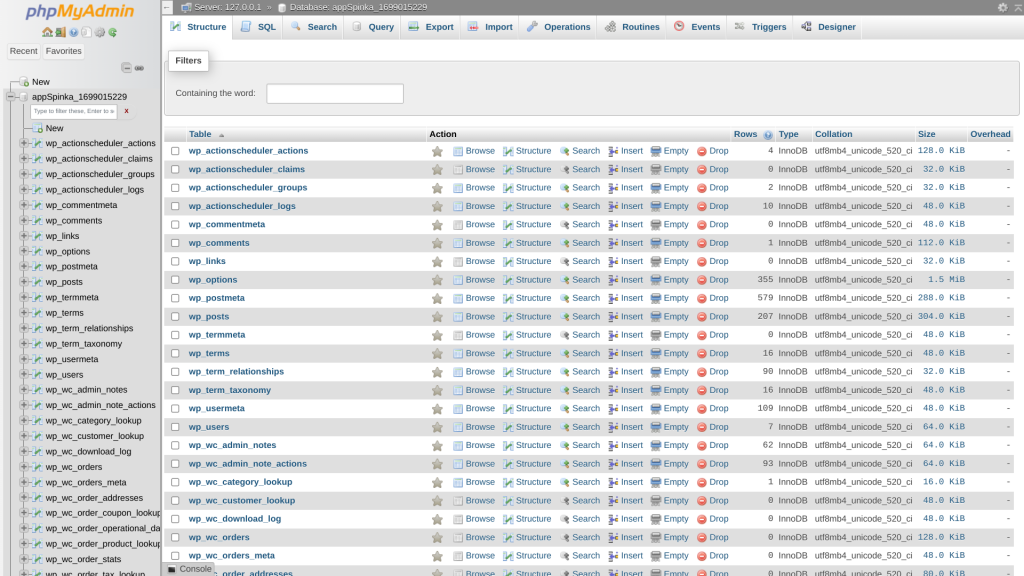
You can use a web-based database management tool, such as phpMyAdmin, to access your database. Once you’re logged in, you will see a list of tables that belong to your database.

Now that you have access to your server and database, you can proceed to back up your WooCommerce store and database properly.
Step 2 - Backup WooCommerce Store Files
When performing a WooCommerce backup, you’ll need to copy the WordPress core files, the wp-content folder, the .htaccess file, and any other files that you have added or modified on your server. Backing up these files ensures that your store’s functionality and appearance are preserved.
To back up your WooCommerce store files, you can use a command-line tool, such as rsync or scp, to copy the files from your server to your local computer or another location. You will need to enter the source and destination paths of the files that you want to back up, and the tool will transfer the files securely and efficiently.
For example, you can use the following command to back up your entire WordPress installation using rsync:
rsync -avz -e ssh username@hostname:/path/to/wordpress /path/to/backupThis command will copy all the files from the WordPress folder on your server to the backup folder on your local computer. Just make sure to replace:
usernamewith the name of the user account on your server (for example, root)hostnamewith your IP address or domain name/path/to/wordpresswith the location of the WordPress installation on your server (for instance,var/www/html)/path/to/backupwith the folder location on your computer where you want to download your WordPress files. If you are in a hurry, you can use a period (.) to store files in the current directory.
Similarly, you can also use the scp command to back up data. Let’s look at an example of copying only the wp-content folder using the scp utility:
scp -r username@hostname:/path/to/wordpress/wp-content /path/to/backupThis command will copy the wp-content folder and its subfolders from your server to the backup folder on your local computer. If you use a custom SSH port, you can modify the commands according to your needs and preferences.
Step 3 - Back Up Your WooCommerce Database
Your database contains your store’s settings, products, orders, and customers. This information is stored in various tables, all of which usually have the prefix wp_ which makes them easy to identify. it’s essential to back up these tables to ensure that both your store’s data and transactions are preserved.
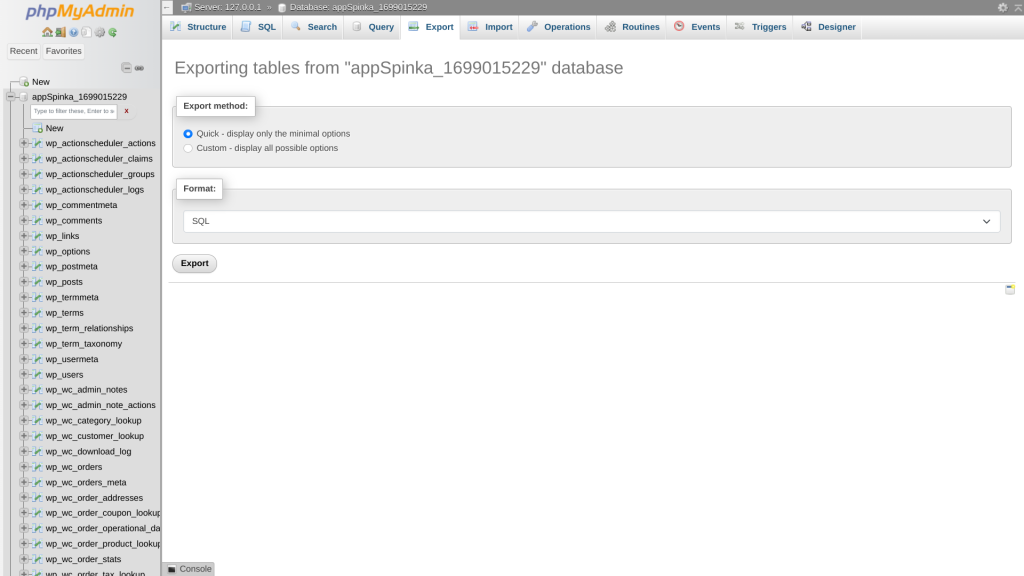
To back up your WooCommerce database, you can use a web-based database management tool, such as phpMyAdmin, to export the entire database or selected tables to a SQL file. You can then download the SQL file to your local computer or another location. To export your database using phpMyAdmin, follow these steps:
- Log in to your database using phpMyAdmin using the credentials acquired in step 1.
- Select your database from the left sidebar.
- Click on the Export tab at the top.
- Choose the Quick option to export all the data using default settings. Alternatively, you can use the custom option and select the tables that you want to back up.
- Choose the SQL format and check the Save output to a file option.
- Click on the Go button and save the SQL file to your desired location.

Step 4 - Test and Restore Your Backups
After you have backed up your WooCommerce store and database, it’s always recommended to test and restore your backups to ensure that they are working properly and can be used in case of emergency. You can test and restore your backups by using the same tools and steps that you used to create them but in reverse order.
- Create a test server and database that are identical to your original server and database. Since we are only testing, this website doesn’t need to be accessible on the public internet. Therefore, you can use a local server to create a test environment.
- Import your SQL file to your test database using phpMyAdmin. You can follow the same steps as exporting your database, but choose the Import tab instead of the Export tab.
- Copy your store files to the appropriate location. If you are hosting your site on a test server, you can follow the same commands as backing up your store files, but swap the source and destination paths.
- Check your test store and database for any errors or discrepancies.
If your test store and database are working properly, you can be confident that your backups are valid and can be used to restore your original store and database in case of emergency.
Method 2: Using a Service/Plugin for WordPress Backups
Alternatively, you can use an automated tool or a fully managed service to back up your data, encrypt it, and store it in multiple locations across the globe. Using a dedicated backup service is often a straightforward process and ideal for beginners.
However, choosing a backup plugin or service for your WordPress store can be hard, as there are many options available – all with different features, prices, and levels of compatibility.
You may want to consider some factors, such as:
- How often do you want to back up your store and database?
- How much storage space do you need for your backups?
- How secure are your backups, and how easy are they to restore?
- How much control do you have over your backup settings and schedules?
- How well does the backup plugin or service work with WooCommerce and other plugins?
To help you choose the best backup plugin or service for your WordPress store, we’ve written a post about the best backup solutions in 2024. In this post, we compare and review some of the most popular and reliable backup plugins and services that are compatible with WooCommerce.
Once you have selected your backup plugin or service, you can easily back up your website using the on-screen instructions. The exact steps may vary depending on the plugin or service you choose, but generally, you will need to:
- Install and activate the backup plugin or service on your WordPress dashboard.
- Configure the backup settings, such as the backup frequency, location, encryption, and retention.
- Run a manual backup or wait for the scheduled backup to start.
- Check the backup status and logs to ensure that everything is working correctly.
Final Thoughts
Creating a secure WooCommerce backup is vital for the long-term security of your website. Backing up your WooCommerce store and database properly can save your online business from a range of threats and disasters. By following the steps in this article, you can back up your store and database without using any backup plugin or service.
If you wish to use a dedicated WordPress plugin, you can also go down that route. However, you should remember that there are almost 60,000 plugins available on the WordPress plugin repository – a few of which actively audit their codebase for potential security issues.
And this is why we built Patchstack. With Patchstack, you can get notifications for new security vulnerabilities, automated protection with virtual patches, remotely managed software updates with automation, and much, much more. Start using Patchstack for FREE!


